12 Volt Battery & Accessory Guide
Don’t Get Stranded!
The DIY Guide to Additional Battery Options for your Truck, Camper or Van
Auxiliary Batteries, Jump Boxes, Isolators & 12 Volt Battery Variations
Unfortunately, the days of manual transmissions seem to have gone away for good. One of the saddest things about this truth, is the loss of the ability to bump start your engine when your battery is dead or too low to start your ride. Sure its easy to carry jumper cables and ask someone for a jump but as anyone who spends time in the backcountry knows, self reliance is paramount to comfort and at times survival. What if no one stops or worse yet, no one is even within miles of you?
With most modern cars having automatic transmissions and no way to bump start without a manual clutch, a dead battery can leave you stranded and at times in danger. While cell phone service is definitely better than it ever has been, there are still plenty of remote pockets of no-service where it’s be tough to reach out for help if your battery dies. Travel to or through some of these remote areas and inadvertantly leaving your lights on, radio playing too long or forget to unplug your refiregerator and you could be in for a long hike out to get help. Even in areas with great cell service, a dead battery can be a pain in the ass to deal with. But have no fear, there are now more options than ever before to be self-sufficient and prepared in the event you end up with a dead battery.
Understanding 12 Volts – The Basics
Most, if not all modern vehicles employ a 12 volt electrical system standard. These systems generally rely on a single 12 volt battery to start the vehicle’s engine. When the engine is running, a small generator called an alternator is powered by the engine. As the alternator pulley is turned by a belt connected to the engine (typically also connected to the vehicle’s cooling fan and air conditioner compressor – and called the fan belt or serpentine belt), the alternator is spun through a series of coiled copper wires and produces electrical current to two wires. The current coming out of the alternator will vary with the speed at which the engine is running. When the vehicle is idling for example at low RPMs, the alternator current output will be low, but when the RPMs increase, the alternator current output will increase as well. To stabalize the variable current output coming out of the alternator at various engine speeds, the electrical system contains a voltage regulator. These components are built in to most modern alternators but are occasionally still a seperate component.
In the 12 volt electrical standard, a fully charged 12 volt automotive or marine battery actually holds 12.6 volts. As you start your engine, the battery voltage will drop as it works very hard to turn the starter until the engine is running. In colder temperatures, engines are harder to turn, so starters have to work harder and require more current or “juice” to get the engine going. The longer the engine takes to crank or start, the more juice is getting used from the battery. Once the engine is running, the alternator will immediately begin charging the battery.
Electrical current wants to equalize, so alternators will only charge a battery if they are putting out more current than the battery. For this reason, most alternators are designed to put out at least 13 volts when the engine is running to ensure the battery is charged to the 12.6 volt “full charge” standard.
Size Matters
The bigger engine you have to start, the bigger battery you will need. Diesel engines by nature of design, have much higher compression than gasoline engines and thus take much more power to turn over. For this reason, diesel engines require larger starting batteries than a comparably sized gasoline engine. Most heavy-duty trucks even come with two starting batteries from the factory. The larger batteries still produce 12.6 volts at full charge but have a greater capacity and are thus able to sustain the 12.6 volt output for the longer period of time it takes to crank larger engines. It may help to think of the capacity as mass. A small person might be able to push a heavy object an inch at a time but not sustain a constant push, whereas a larger person may be able to continuously push the heavy object for a much longer period of time before they run out of steam. Battery size essentially follows this same logic.
Calculating Load Requirements
Connecting Multiple Batteries
Combining multiple smaller batteries can have the same effect as increasing the size of a single battery if they are hooked up correctly. There are two ways to combine multiple batteries, one is called “in series” and another is called “in parrallel”. The difference between these two ways of combining batteries is extremely important to understand. Incorrectly combining multiple 12 volt batteries can cause explosions and fires. Theres nothing to be afraid of if you understand the difference.
Combining multiple batteries “in series” will multiply the voltage by the number of batteries you have, for example, if you were to combine 3 – 12 volt batteries in series, by connecting the negative on one battery to the positive on another, and so forth until you have a single loose negative and positive wire, the voltage output on the loose ends would be 3 x 12 = 36 volts. This is generally not what you want to do for typical applications, other than perhaps makeshift welding. Connecting batteries in series would output 36 volts but not increase your overal capacity at all – not really helpful.
The more useful setup is to connect batteries in parallel. This means connecting positive to positive, and negative to negative. When doing this, the batteries should be approximately the same size and age so that they paly well together, but connecting two or more batteries this way will increase the running capacity or time the batteries can output 12.6 volts. This means they can crank the engine longer (like we mentioned on heavy duty trucks), run accessories longer without charging and so forth. If you have accessories you like to run without the engine running, adding additional batteries in this manner will enable your run time between charges to increase.
Isolating Batteries
So let’s say you run some electrical accessories in your vehicle that could potentially drain your battery in a few hours. These could be lights, a power inverter, a 12 volt refrigerator/freezer, TV or just about anything. If you want to be able to run the accessories longer without having to start the vehicle to charge the battery, you could add additional batteries in parallel. Doing so would definitely increase the time you can run your accessories between charges but if you run them too long, you could still be left stranded as the two batteries together wouldn’t have the power to start your vehicle. To keep this from happening the goal is to allow both batteries to charge when the engine is running, but to isolate the starting battery from any additional battery(s) you may have when the alternator is not running (engine off). Isolating the starting battery then will allow your accessories to run until the accessory batteries are completely drained, yet you’d still be able to start your vehicle by the main starting battery since it would be fully isolated when the engine is off.
There are a few different ways to accomplish 12 volt battery isolation and they’ve gotten much simpler over the years with several technological innovations. Back in the early 2,000s to create a fullproof battery isolation system, I used a series of relays and a soenoid switch. In the simplest terms, the output from the alternator would trip a relay (a relay is a switch that is turned on/off by electrical current rahter than moving a level or pushing a button with your hand) that relay would then send voltage to the solenoid (basically a very large relay). When the solenoid was on (engine running and alternator spinning), the two batteries would be connected in parallel. However, when the alternator was not spinning (engine off), the solenoid would automatically spring back to the off position, breaking the connection between the two batteries. This meant that the two batteries could then be drained independently without affecting one another, thus so long as the accessories were connected to the second battery, that battery could be drained and the main battery would remain fully charged. Then when the engine is started up again, the solenoid would turn back on and both batteries would charge via the alternator.
I’ve had this relay/solenoid system installed in my 80 Series Toyota Land Cruiser for over fifteen years now and it is still working flawlessly to this day. I even added a manual override switch so that I can simply turn the switch to connect both batteries to override the isolation when the engine is off so that if the main battery were to die, the second battery could start the engine. I’ve used the override many times over the years, whether I left an interior light on, the main battery is dead or low from sitting for a long period of time or just old and due for a replacement, I can say I was never stranded by a dead battery. Simply pop the hood, flip the switch and she fired right up. I truly do love this system. The only downside is the amount of time, work and pieces involved to put it together. There are many wires and connections that could each possibly fail or short out and this probably took over a day or two to setup.
Theses days there are some other great options out there for battery isolation that I’d highly recommend – namely the Battery Doctor. In fact if I ever have an issue with the home made isolation system in my Land Cruiser, I’m going to upgrade to the Battery Doctor. So just what is the battery doctor? The Battery Doctor is a beautiful piece of engineering built by a company in Minnesota called Wirthco, and essentially all of the relays, wires, connections, blood, sweat, tears and two days of work described above are in a simple electronic box the size of a tub of cream cheese that you can buy for $60-80.
The Battery Doctor has three connections for wires. Basically run a positive lead from your main battery to one Battery Doctor terminal, a positive lead from your second battery (or multiple additional batteries in parallel) positive terminal(s) and connect a small ground wire. Your accessory batteries should also be grounded. The connections from the batteries to ground and batteries to the Battery Doctor should all be heavy gauge wire appropriate for handling high output current (similar in size to most jumper cables). Make these connections and you are good to go. It will operate exactly the same as the system I built above but without all of the parts, labor and potential points of failure. The Battery Doctor even adds a few great features like waiting for 1 minute before and after starting and stopping the engine before connections are swtiched and waiting until the alternator output is at the optimum level before charging the aux battery, so that your starting battery is charged by priority if the alternator output is low.
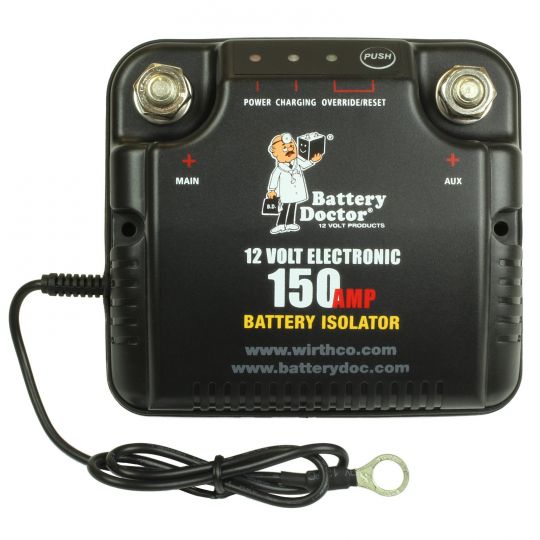
How does it work? As soon as you start your vehicle, the Battery Doctor looks for the voltage coming through the main battery positive terminal to exceed 12.6 volts. Remember your alternator needs to produce more than 12.6 volts in order to charge the battery…so once the Battery Doctor detects in excess of 12.6 volts, it assumes the alternator is working and makes an internal switch trip to connect the accessory batteries to the main battery and alternator to charge. This means when the engine and alternator are running, the aux batteries will charge but then when the engine/alternator are turned off, the aux battery connection will be isolated. Exactly what we want. So long as you make sure to wire any accessories to the aux/accessory battery(s), you will not be at risk of draining your starting battery when running your accessories.
The Battery Doctor also has an override to jump start your engine should the main starting battery go dead and assuming the aux battery(s) have enough juice to start your engine. The override is essentially a temporary manual connection between the main and auxiliary batteries. Once the engine is on, the Battery Doctor is setup to reset the override and the default normally isolated behavior will return. I have this system in another vehicle and can’t recommend it enough. It is simple to use, well-designed and the company offers incredible support if you need it. I’ve spoken with their engineer several times and questions were answered immediately.
The Battery Doctor does come in two sizes, 100 Amp and 150 Amp, and the size you need depends on the output of your alternator. You want to be sure the Battery Doctor you purchase is rated to at least the amperage output of your alternator. For example, if your alternator outputs 80 Amps, the 100 Amp Battery Doctor is fine. If your alternator puts out 140 Amps, you’ll need the 150 Amp Battery Doctor. If you don’t know the amperage output of your alternator, I’d recomend you just purchase the 150 Amp Battery Doctor, the price difference is very small and it will not hurt to install the larger 150 Amp Battery Doctor on any alternator putting out less than 150 Amps. There is a chance your alternator puts out more than 150 Amps, but this would be unlikely on most vehicles. If in doubt, do some more research before purchasing the Battery Doctor. If you do have an alternator that puts out more than 150 Amps, you’ll have to build your own isolator system or look to a commercial isolator for ambulances and firetrucks.
Jump Boxes
There are many Battery Jump Boxes on the market today, and they come in all shapes and sizes. These tools are quite handy to carry on the road should you find yourself with a dead battery. Instead of needing to find another car and jumper cables, you just hook up your jump box to your starting battery with two cables and turn your key. Jump boxes are extremely handy tools but you do need to make sure they are sized appropriately for your engine and battery so that they have enough power to turn your engine over in cold temperatures. Remember bigger engines and diesel engines require more battery power to start than smaller, gasoline powered engines.
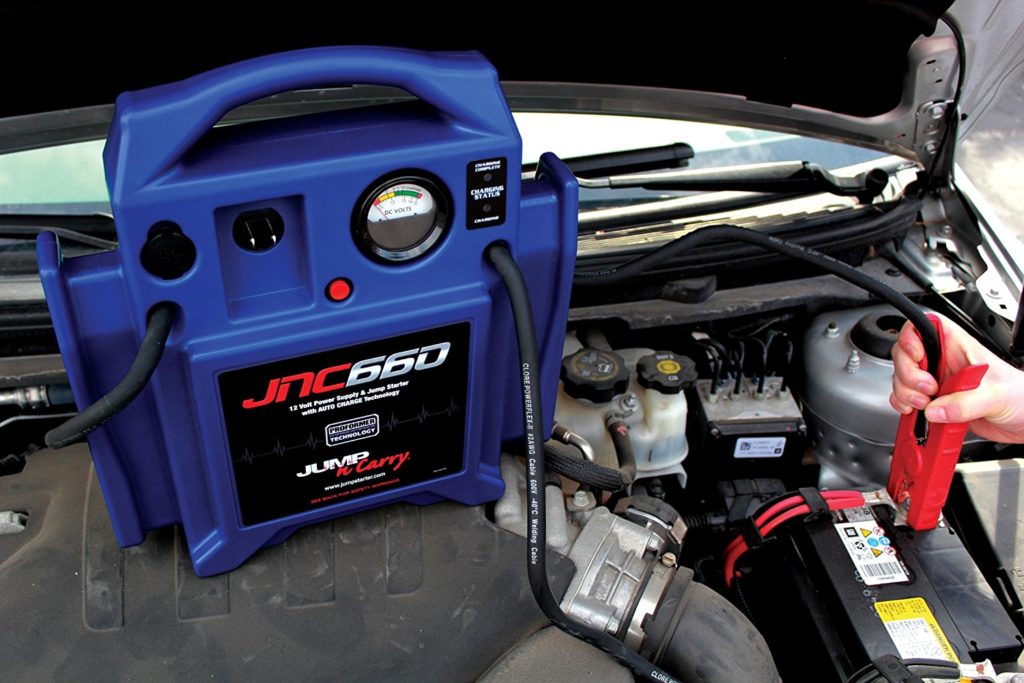
The other important thing to remember with jump boxes is that they need to be charged! Just like other batteries, the batteries inside of jump boxes will lose charge over time. There are some newer battery technologies entering the market that hold their charges much longer over time, but you must still remember to charge these devices periodically so that it is fully capable of starting your engine, should you need it in an emergency.
The Clore Jump Box comes in sizes suitable for just about any vehicle out there and has over 5,000 positive reviews. It is a great tool to have on the road or trails and good backup to have even if you have a auxiliary battery. We carry one on any road trip as piece of mind and have used it at least a dozen times over the years.
Battery Connections
When adding additional battery(s), you will need to figure out how to connect the battery(s) to accessories, ground and your isolator. There are various types of connections you can use lncluding lugs, trailer connectors, Anderson connectors, battery clamps, marine connectors, military clamps and MC4 connectors to name a few. Each of these connectors has very specific purposes that may or may not make them suitable for your setup.
Battery Clamps
Military Battery Camps
Battery Lugs
Trailer Wire Connectors
Anderson Connectors
MC4 Connectors
Avoiding Shorts & Fires
When using any of these specialty connectors, the most important thing to remember to to use the proper wire size and be sure that the wire to connector connection is made properly. A poor connection can lead to electrical shorts, overheating and even fire. Some of theses specialty connector require special tools and others do not. Also, remember that most 12 volt DC electrical systems use a negative ground meaning the battery is grounded through the frame and body of your vehicle. This means that any metal on your vehicle that is touching other metal will be electrically connected to the negative terminal on your battery. One benefit to this arrangement is that you really only have to run one power wire to your accesory and then add a short ground wire to a nearby metal component on the vehicle to get a complete circuit. However, remember that the entire vehicle is connected to this negative terminal, so any open or exposed positive terminal, wire, lug or other connector could arc if it touches metal on the vehicle. The arcing metal could potentially even weld itself to the vehicle and start a fire! To prevent this we use fuses and circuit breakers.
Fuses & Circuit Breakers
Electrical Fuses are short pieces of metal (we’ll call it a bridge) that are enclosed in case and engineered to handle passing electrical current up to a maximum amount. One side of the bridge has the positive current flowing from the battery and the other side of the bridge leads to your accessory or load. A 10 Amp fuse for example, can handle current flowing through the fuse of up to 10 Amps. Anything greater than 10 Amps, will be too much for the short metal bridge to handle, and the metal will break or burn up, breaking the positive connection to the load. So if a 10 Amp fuse is located near your battery and the wire going to the load were to touch the metal on your vehicle, the load would try to pass many Amps through the fuse, but the bridge would break as designed and prevent the arc from continuing to pass current and heat which coul ultimately casue the fire.
Circuit Breakers serve the same purpose as fuses, but when fuses burn out or break, they need to be replaced. Circuit breakers can be thought of more like a drawbridge as they are reusable when the bridge burns. When electrical current exceeds the current the breaker is designed to handle, the breaker trips stopping the flow of current. Instead of having to replace the breaker, they are resettable with a button. So if the electrical fault that caused the breaker to trip is fixed, push the reset button to reset the breaker. If the breaker trips again, the fault still exists. The downside to circuit breakers is that they cost more than fuses. Typically in vehicles fuses are used but circuit breakers are also available. The choice is yours.
Another purpose for fuses and circuit breakers is to protect your accessories from too much electricity if the accessory were to malfunction or overheat. The fuse, if appropriately sized would break before the accessory or appliance could overheat. Sizing fuses, circuit breakers and wiring is discussed below.
Sizing Wire
An important part of 12 volt DC electrical systems is wire and not all wires are the same. Generally speaking the bigger appliance, the brighter the light or the longer the load is from the power source, the thicker the wire will need to be. Proper wire size can be calculated based on load requirements in amps and the distance the load is from the power source, but it may be simpler to use wire sizing table to ensure your wire is sized for the maximum load. When using these guidelines, it is better to overzie a wire than to undesize it.