Building Our First Camper Van
“Shamu the Sprinter” (we didn’t name it)
In the summer of 2018, on a complete whim we bought a cargo van. The thought was we’d convert the van into a multi-purpose machine, a “tent on wheels”, “mobile retreat” & “sacred place teleporter”. The van would hopefully make it easier to leave behind the “busy world” and get out. Out and into the natural places we love so much. We still love the chill of sleeping under the stars on a cool fall night, the tactile experience of living in your own breath in a cold tent, and the otherworldy aroma of waking up in a boreal forest. The van was not meant to be a replacement for these dreamy connections to nature, but rather a way of helping to cultivate more of these experiences. If we made it more convenient to serendipidously jump in and drive to wherever and get some shut eye, maybe we’d get out there more often. Here’s the story.
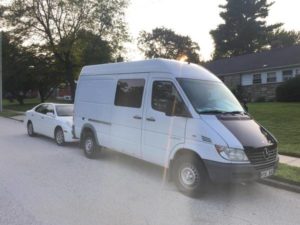
Shamu was a 2006 Dodge Sprinter 140 High Roof Van and came into our lives in August of 2018. The commercial style van was originally purchased by a professional photographer and used to transport camera equipment to photo and film shoots. The photographer’s brother happened to be a German car mechanic named Gene, and from day one, the van was serviced in Gene’s repair shop. Gene is one of those anal retentive types who not only kept up with service, but performed every preventative maintenance task imaginable. Gene fell in love with the van and after several years convinced his brother to sell it to him after the van was written off and replaced. Gene promptly removed the Dodge emblems which were installed only on some U.S. bound Sprinters at the time, as Dodge and Freightliner were branding Mercedes T1N Sprinter vans as their own. He re-badged the van as the Mercedes Sprinter as it was actually born to match the appropriate model year badging that was found on all Sprinters outside of the United States. At the same time, Gene added a black racing stripe to the hood, giving it a subtle touch of character in the European racing tradition. The new black and white colored effect reminded Gene’s daughter of Shamu, the famous killer whale and from there on out the van was known by that name.
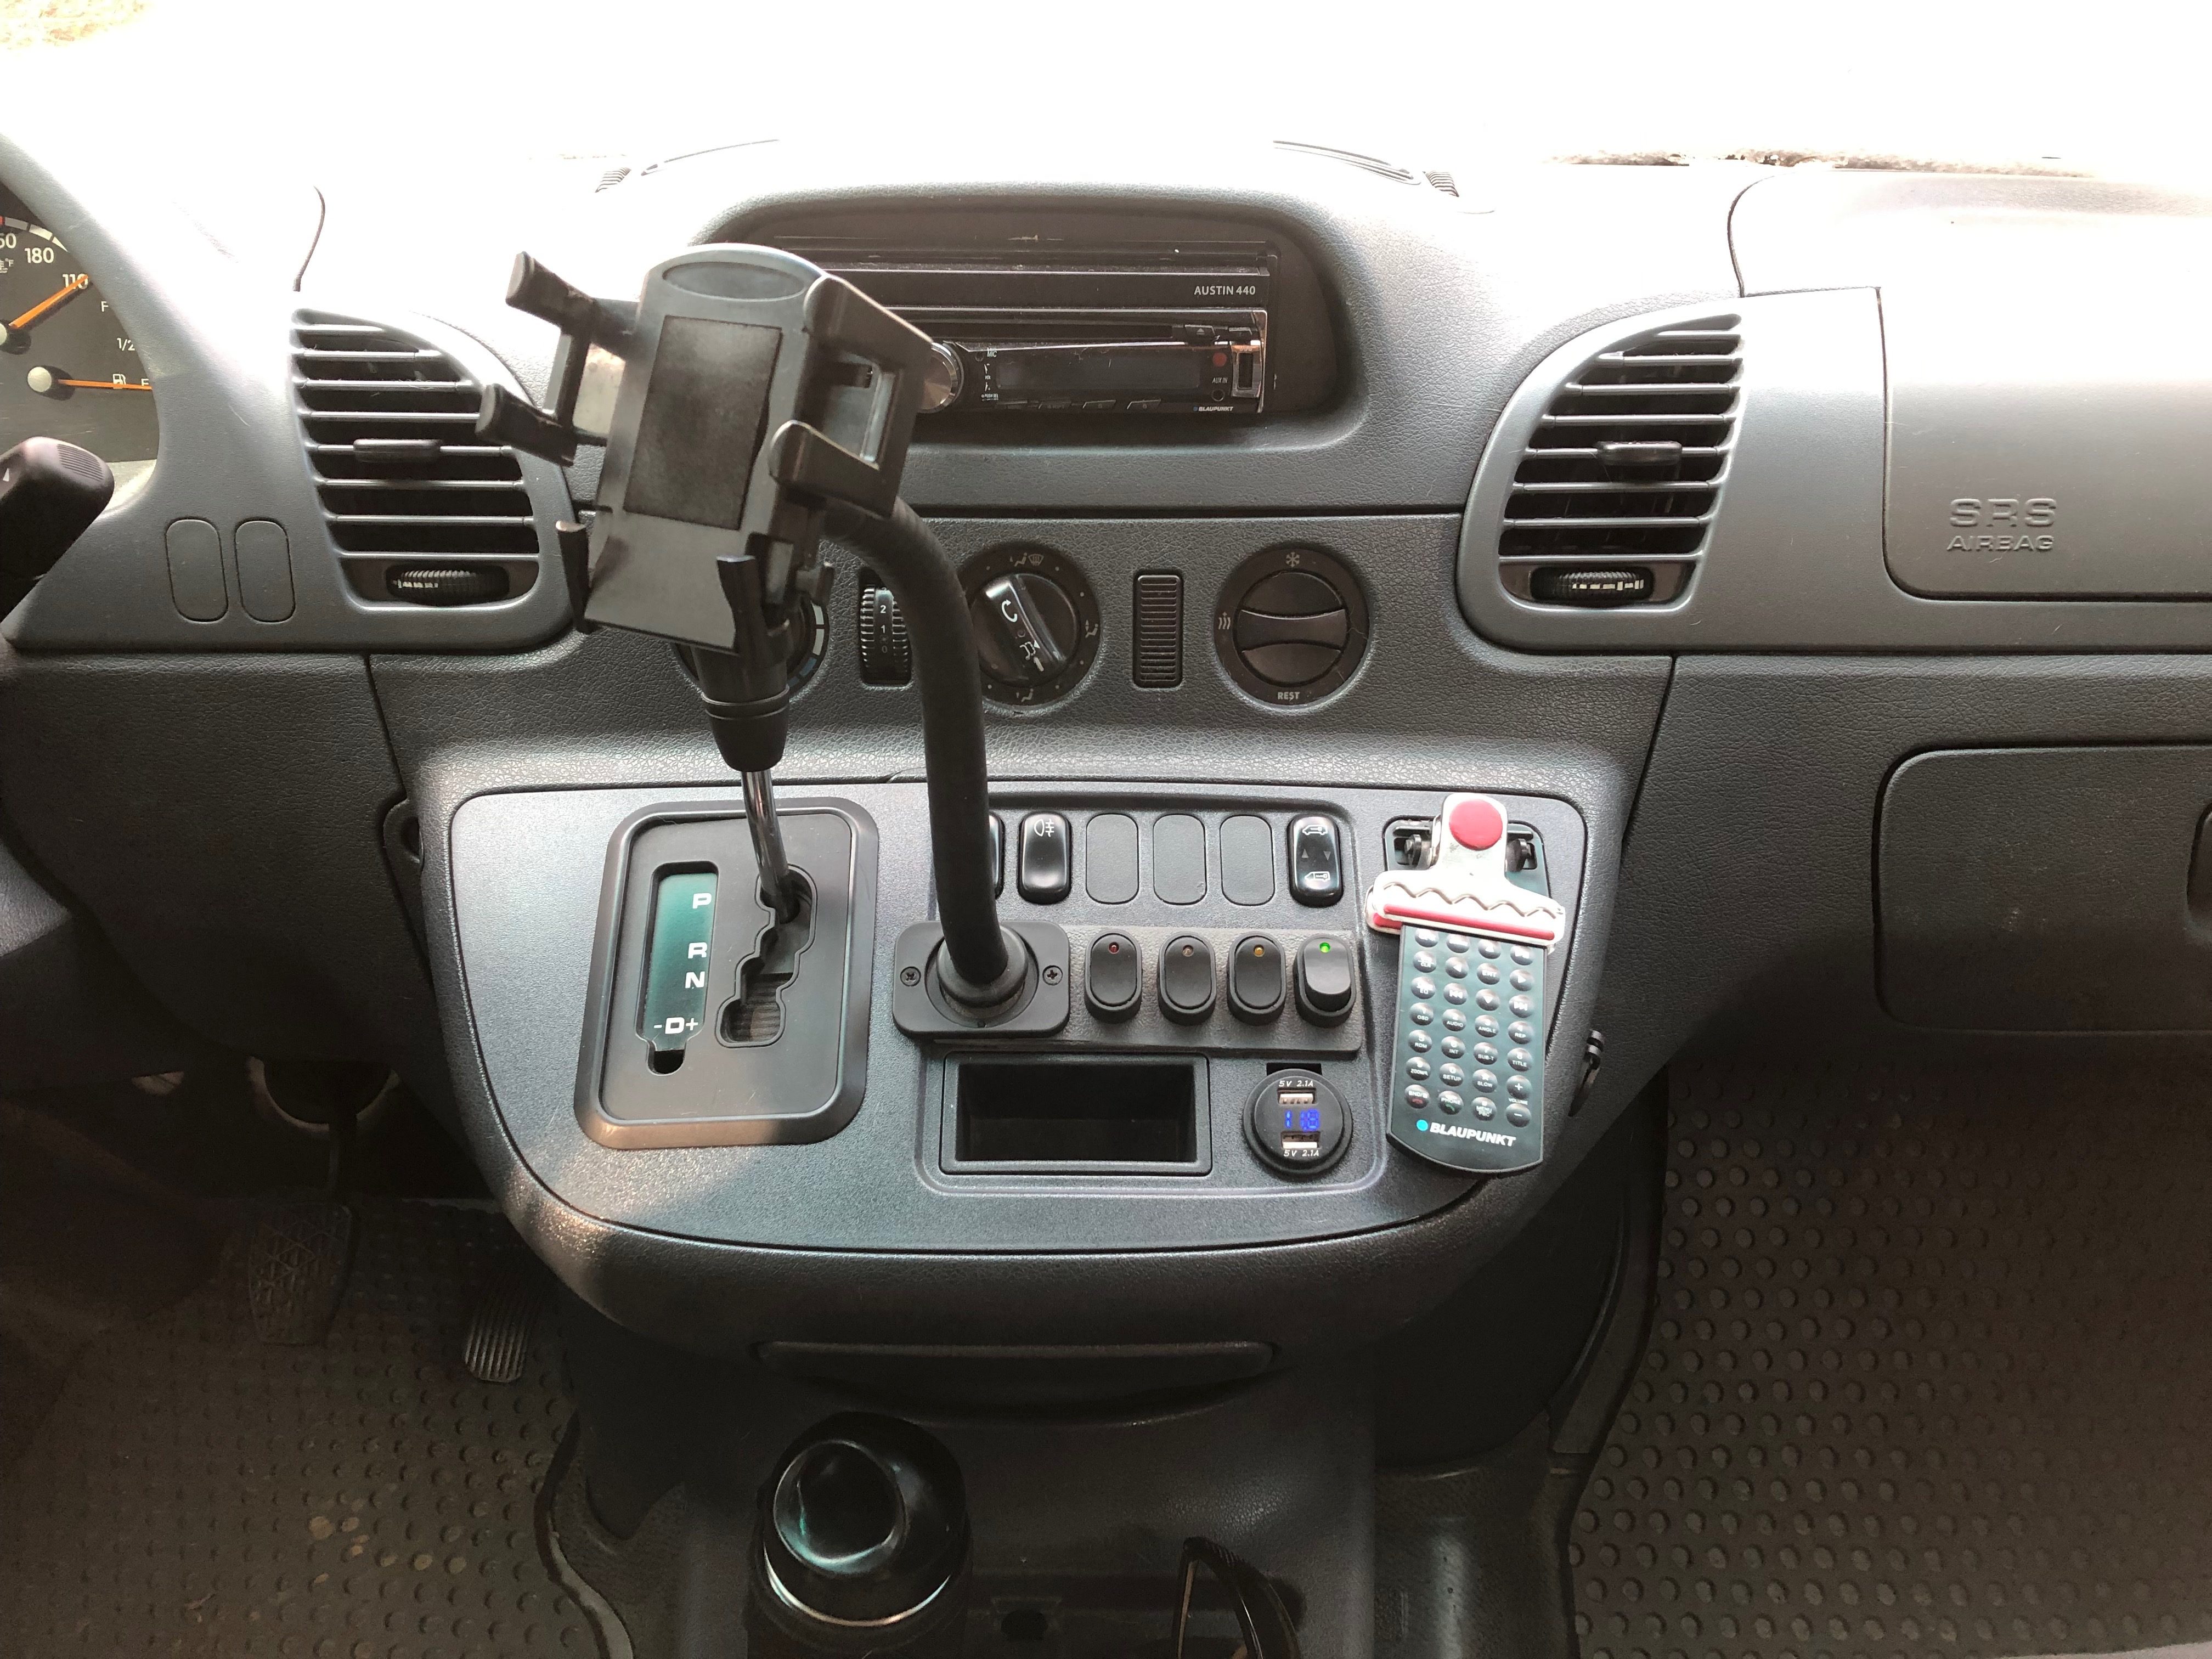
For years Gene used Shamu to pick up parts for the race cars he was working on, traveling to German car swap meets, moving his daughters to college and he would even occasionally throw an air mattress in the back for a road trip down the east coast. The van was stored in a heated garage for most of the winter and according to Gene never saw snow or even an icy road, let alone any road salt. Over the years Gene took great joy in performing many preventative maintenance tasks, including detailed oil services, cleaning the fuel injectors and glow plugs, servicing the cooling system, upgrading the suspension with Bilstein racing shocks, touching up any rust spots (the factory paint jobs are not great on Sprinters) and installing new parts that were prone to failure on some T1Ns, like the OEM turbo resonator which he replaced with an upgraded billet aluminum unit. Gene always used factory parts or better when servicing the van. He upgraded the stereo system to a Blaupunkt Austin 440 with rear view camera system, as “only a Blaupunkt” was suitable for a German made vehicle in Gene’s mind.
In the spring of 2018 after nearly 3 decades in business, Gene closed his repair shop and moved back to his family farm in Maine to take care of his aging mother. He reluctantly decided to sell “Shamu” to someone who’d care for the vehicle as a family member, thinking a 4×4 pickup was a better vehicle for his life on the Maine farm where he grew up. After rejecting many offers including several from the van upfitters ready to fly out from California to purchase the well maintained Sprinter, Gene met Josh, a carpenter from Philadelphia who was looking for a clean Sprinter van with the intention of converting it into a camper van for surfing trips.
Josh had looked at many Sprinters over the years but Shamu was in far better shape than any other he’d come across. Josh and Gene connected enough that Gene felt he’d found the right buyer and they made a deal. Josh had big plans for Shamu but initially just threw down an oriental rug and put a few lawn chairs in the back hitting the road for the beach with surfboards in tow. He and his girlfriend had ultimately planned to do a full-blown “vanlife” camper conversion and drive the van through Baja California, taking a ferry across the Sea of Cortez to mainland Mexico, and eventually all the way to visit friends in Costa Rica in search of the perfect wave. The couple had a vacation planned to Portugal so Shamu sat quietly for a week or two after the purchase. While in Portugal it seemed as if half the country was living in a van, and Josh was full of ideas ready to embark on his conversion when they returned. However while away, Josh’s girlfriend found out she was expecting a baby.
Curve Ball
Completely surprised by the alternate life plan they had been presented with, Josh and his girlfriend concluded that they had to sell Shamu after only several months, to get a car more appropriate for the new family on the horizon. At the same time, we were planning a fall road trip to explore the Cape Breton Island Highlands in Nova Scotia and had been toying with the idea of a vehicle we could more comfortably travel in, camp out of and save some fuel expenses over our beloved 22 year old Toyota Land Cruiser or Heavy ¾ Ton Pickup. We love both of these vehicles for what they are, but had also been dreaming of the ultimate vehicle for decades and had always been intrigued with cargo vans. The interest far predated the romantic tiny house and “vanlife” images trending everywhere these days. It was more of a daydream than real life pursuit, but we were always curious of how a van might enhance our frequent road trips. If it didn’t contribute, we could always sell it to someone with more use for it. We perused renting a campervan as a trial but couldn’t find anything nearby other than large RVs which are not really our thing.
Daydreams often lead to surfing Craigslist and low and behold, there was Shamu, a very clean looking Sprinter van with a personality, just listed and only 30 minutes away from the farm where we live. Josh had been overwhelmed with response to his ad, up only a few days, and was diligently screening phone calls for the low mileage, beautifully maintained T1N Sprinter Van,. Just as Gene did, Josh too wanted to see Shamu go to someone who would take care of it, and use it in a similar fashion to that which he had intended. We communicated with Josh over the Craigslist relay, then via text message, then on the phone, and connected sharing stories of travel and the journey of life. Somehow our daydream lead to meeting up to a test drive (first time driving a Sprinter too) and we ended up making an offer and buying the van the next day. We were excited (and slightly scared) owners of our first van the last week of August in 2018. Excited for obvious reasons but also scared after reading mixed reviews on the reliability and maintenance expense of “Sprinter vans” and hoping we hand’t purchased a money pit.
No Fear
After researching our new purchase we soon realized what a gem we had lucked into and our fear of the unknown subsided as we got to know and trust the old body style, 5 cylinder, diesel powered T1N Sprinter van. The newer body style Sprinters are known as NVC3 (models from 2007+), and have a newer model six cylinder diesel engine with a far more elaborate fuel delivery and emissions system to meet stringent U.S. emissions requirements. The newer vans can run only on low-sulfur diesel. It turns out the complexity of the newer engines is responsible for the reliability issues many Sprinter owners complain of that litter the internet and are documented via mechanical nightmares. The complex systems on the newer vans have many electronic sensors – and any single one can act up and lead to complex and expensive, difficult to diagnose issues when something goes wrong. There are horror stories of the thousands of dollars people spend trying to fix their vans before ultimately selling and switching to another van manufacturer, or reverting to the older T1N (like we have) out of frustration with the newer vans. Even those who purchase brand new Sprinters with factory warranties, complain of the number of times they’ve been towed and left without their vans. People still love the newer Sprinter vans for their utility but the complexity of the electronic and mechanical systems combined with reliability concerns are serious downfalls, so much that Mercedes is introducing a gas-powered Sprinter option for 2019, in hopes of eliminating these concerns – of course at the cost of reduced fuel economy.
Another big con on the newer NV3 vans for the overlander or vanlifer is the fact that any Sprinter newer than 2007 requires low sulfur diesel fuel. This is not an issue in the United States per se, but low sulfur diesel is still predominantly a commodity that is only available in the United States. Most other countries in the world do not even offer an option of low sulfur diesel fuel, espeically in the remote areas. The fuel is simply not available and the newer vans cannot run regular diesel fuel without modifications eliminating the emissions control devices. Thus, the six cylinder NV3 Sprinter van is really a vehicle that can only be driven in the U.S. and Canada where low sulfur diesel fuel is sold. The previous model T1N Sprinters like Shamu, have no such restraints and can run on both low sulfur and regular old diesel fuel, available anywhere world-wide. There are even people who convert the T1N engines to run on fryer oil grease! Yep, that means the T1N is perfect for the Pan-American Highway, the Sahara Desert, traveling across Mongolia, or exploring Iceland, while the 2007 and newer Sprinters sold in the U.S., are basically confined to this country. Lookup how many people travel the Pan American Highway and the world in T1Ns, you’ll be amazed.
The great news for us is that Shamu, being a T1N Sprinter van with the OM647 5-cylinder diesel engine, has a reputation for reliability and to be extremely long-lasting and dependable vehicles so long as basic maintenance is followed. FedEx used T1N Sprinters for many years, even after they moved to NCV3s, and would keep the T1Ns in service until they had 400-600k miles, with minimal service needed along the way. Many companies still have T1N Sprinters in their fleets today and commercial drivers rave about them, as they rarely leave them stranded or hustling to figure out alternatives for their deliveries. The newer NV3s on the other hand have a reputation for being expensive to repair and constantly in the shop and are thus not nearly as desirable as a result. We got the good one!

There is a ton of information out there documenting these differences, but for reliability and world travel capabilities, we’re thrilled we ended up with a T1N. If only it were available in 4 wheel drive here in the United States. A limited number of 4×4 T1Ns were available in Europe but they are very rare and hard to find. In the United States, there are a few companies that have built 4×4 conversions but the conversion can run north of $25,000!
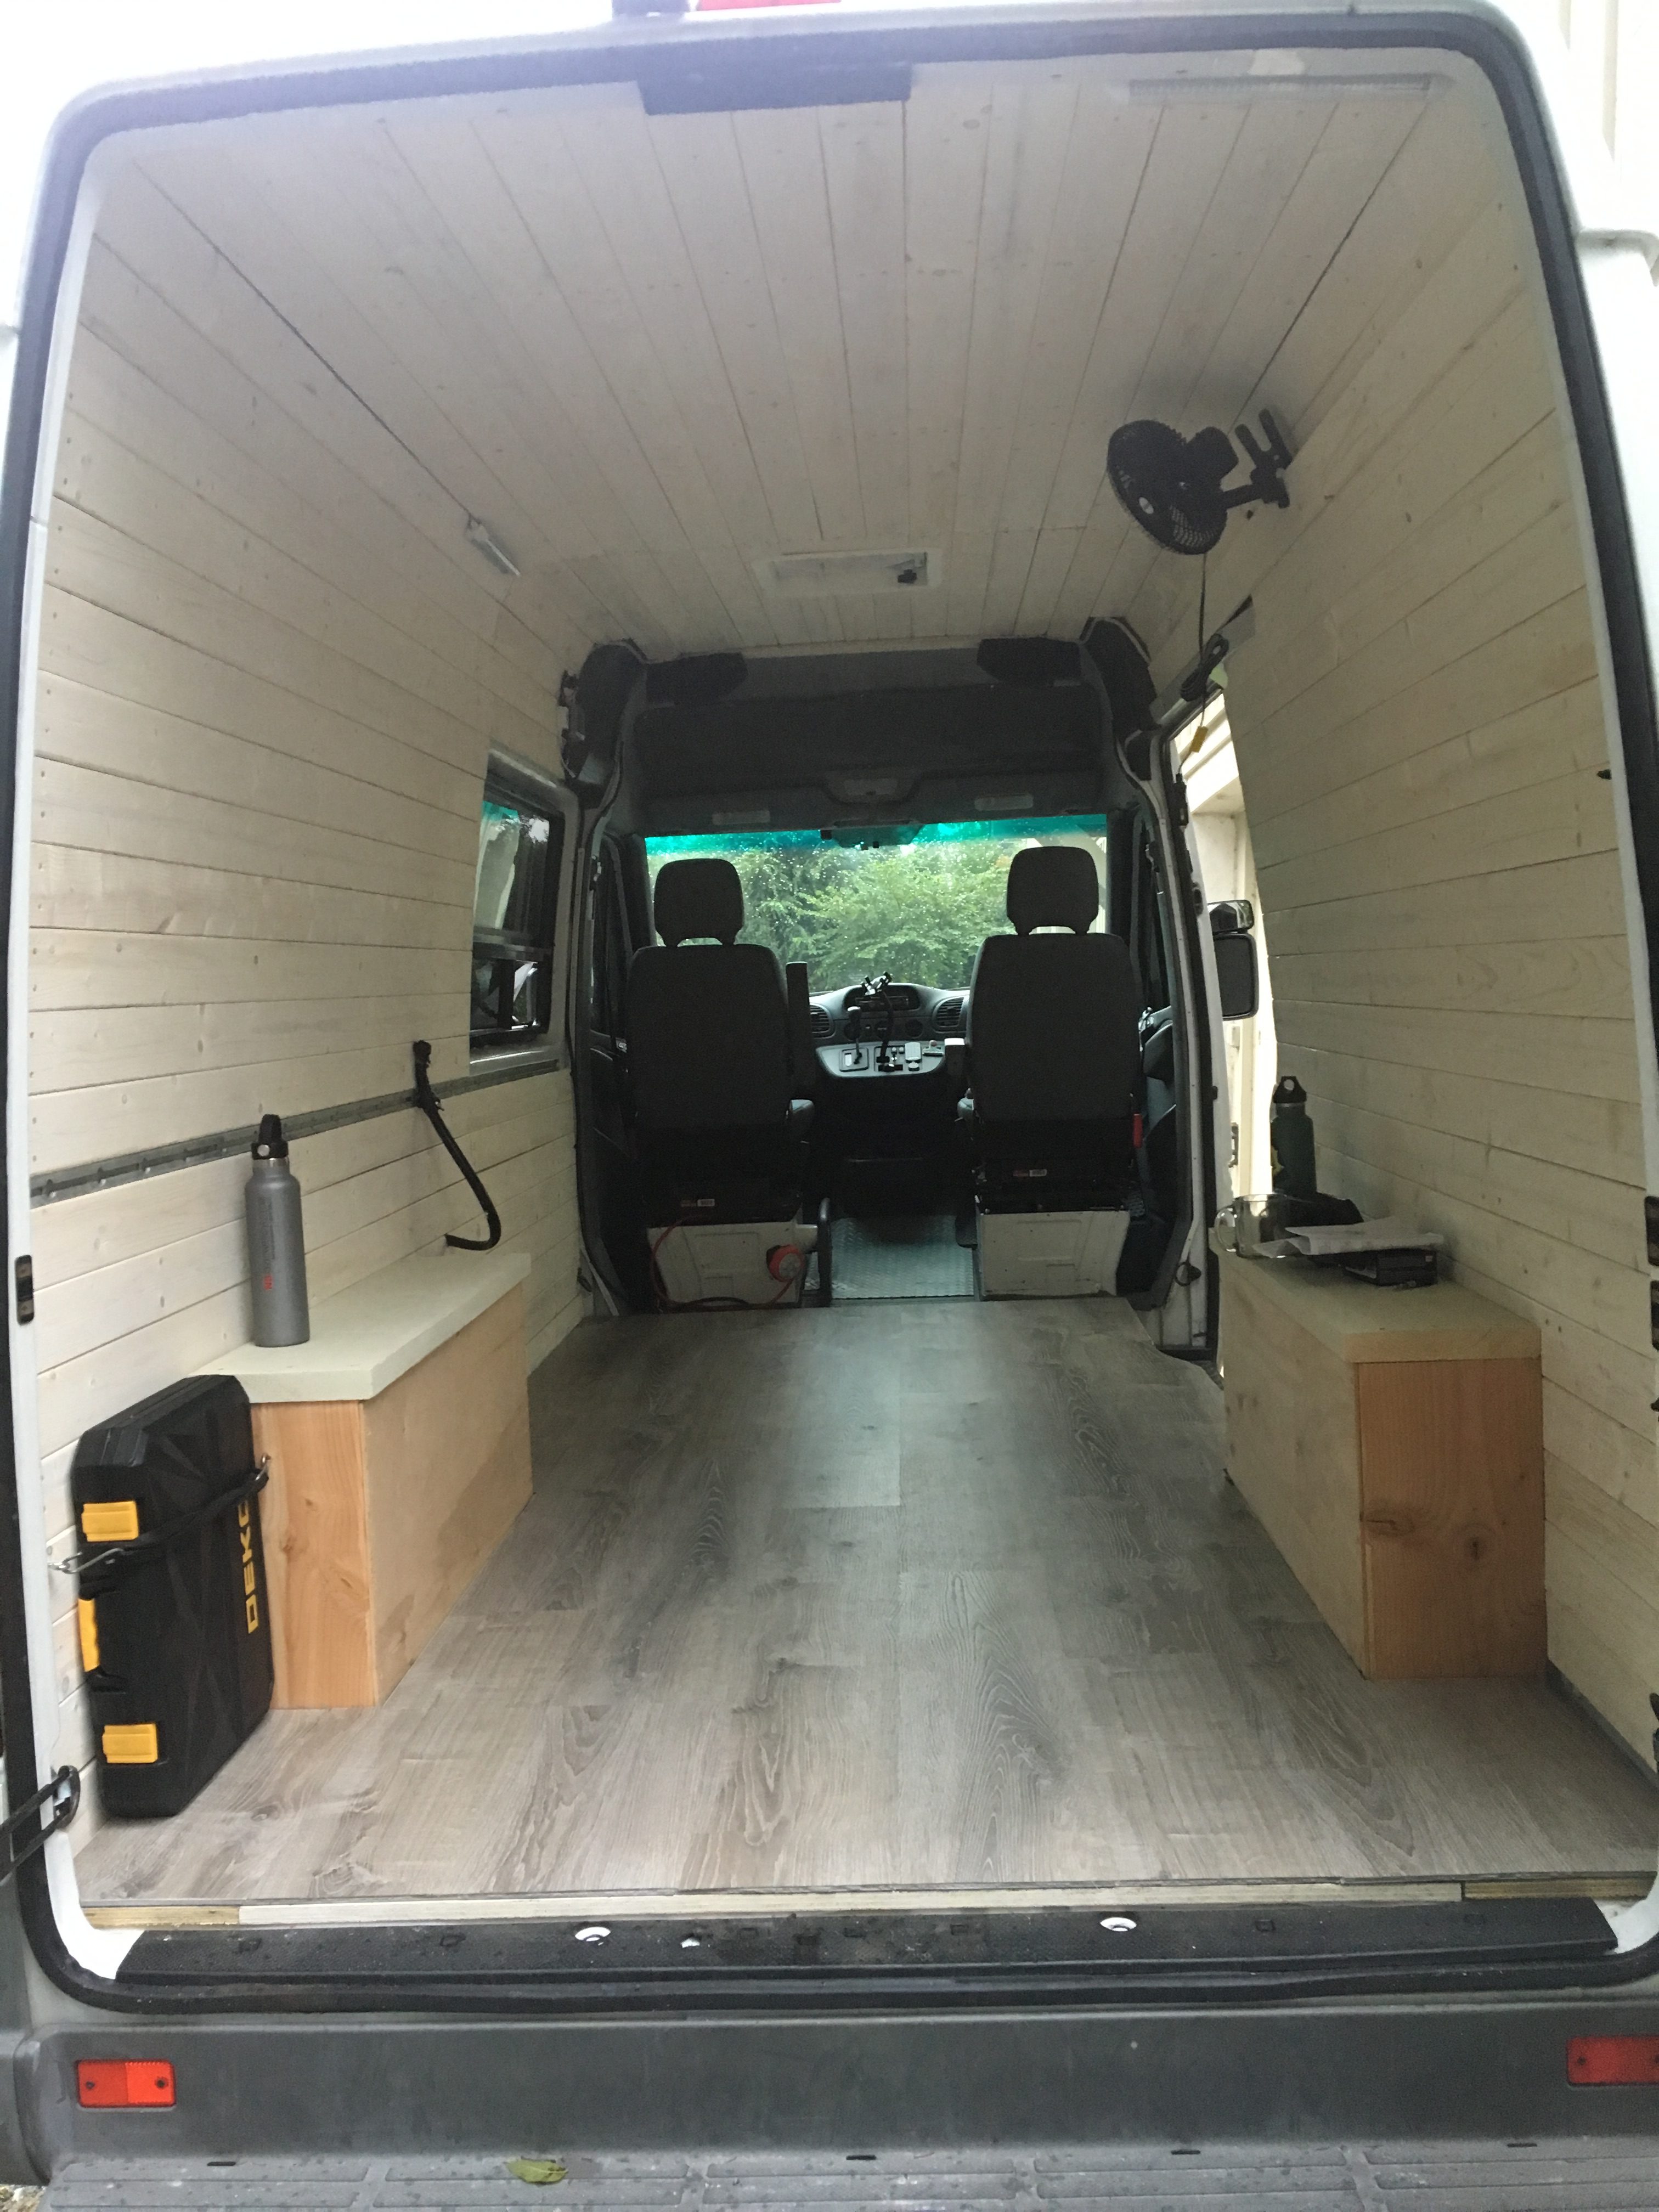
Over the weeks following our purchase we worked quickly to build a minimally viable camper van conversion. We started by removing the factory installed Masonite board floor and repainting the floor and mildly scuffed up interior walls.
Ventilation
Having car camped extensively over the years in our trusty 80 series Toyota Land Cruiser and various pickup trucks, we were familiar with the condensation issues inherent in sleeping inside a steel box (its no fun waking up and having to scrape ice off the inside of your windows when its 4 degrees f outside, so you can drive to the trailhead in time for a sunrise ski tour). Thus, to mitigate moisture concerns, we immediately added a Maxxair fan and a second window with a manually opened hatch for proper ventilation with a factory style window unit manufactured by C.R. Laurence.

Installing these items required cutting holes in the steel body panels of the van, but it went quickly with the proper tools; a nice jigsaw with fresh bi-metal blades, a file, sand paper and white Rustoleum paint. We painted and sealed all of the cut metal edges prior to installing the fan and window, setting them in place with marine grade sealant and butyl tape. If you’re ever doing this, order the butyl tape beforehand as it is hard to find locally. The window added a nice view from inside the van, greatly increased road visibility and reduced a blind spot behind the driver’s seat, which was a nice bonus.
For the ventialtion fan we went with a Maxxair 6200K model with a smoke colored lid. We didn’t realize when we purchased the fan that the lid is actually transparent, kind of like a tinted window and this was a nice surprise as it lets some light in but also provided some shade from the hot sun.
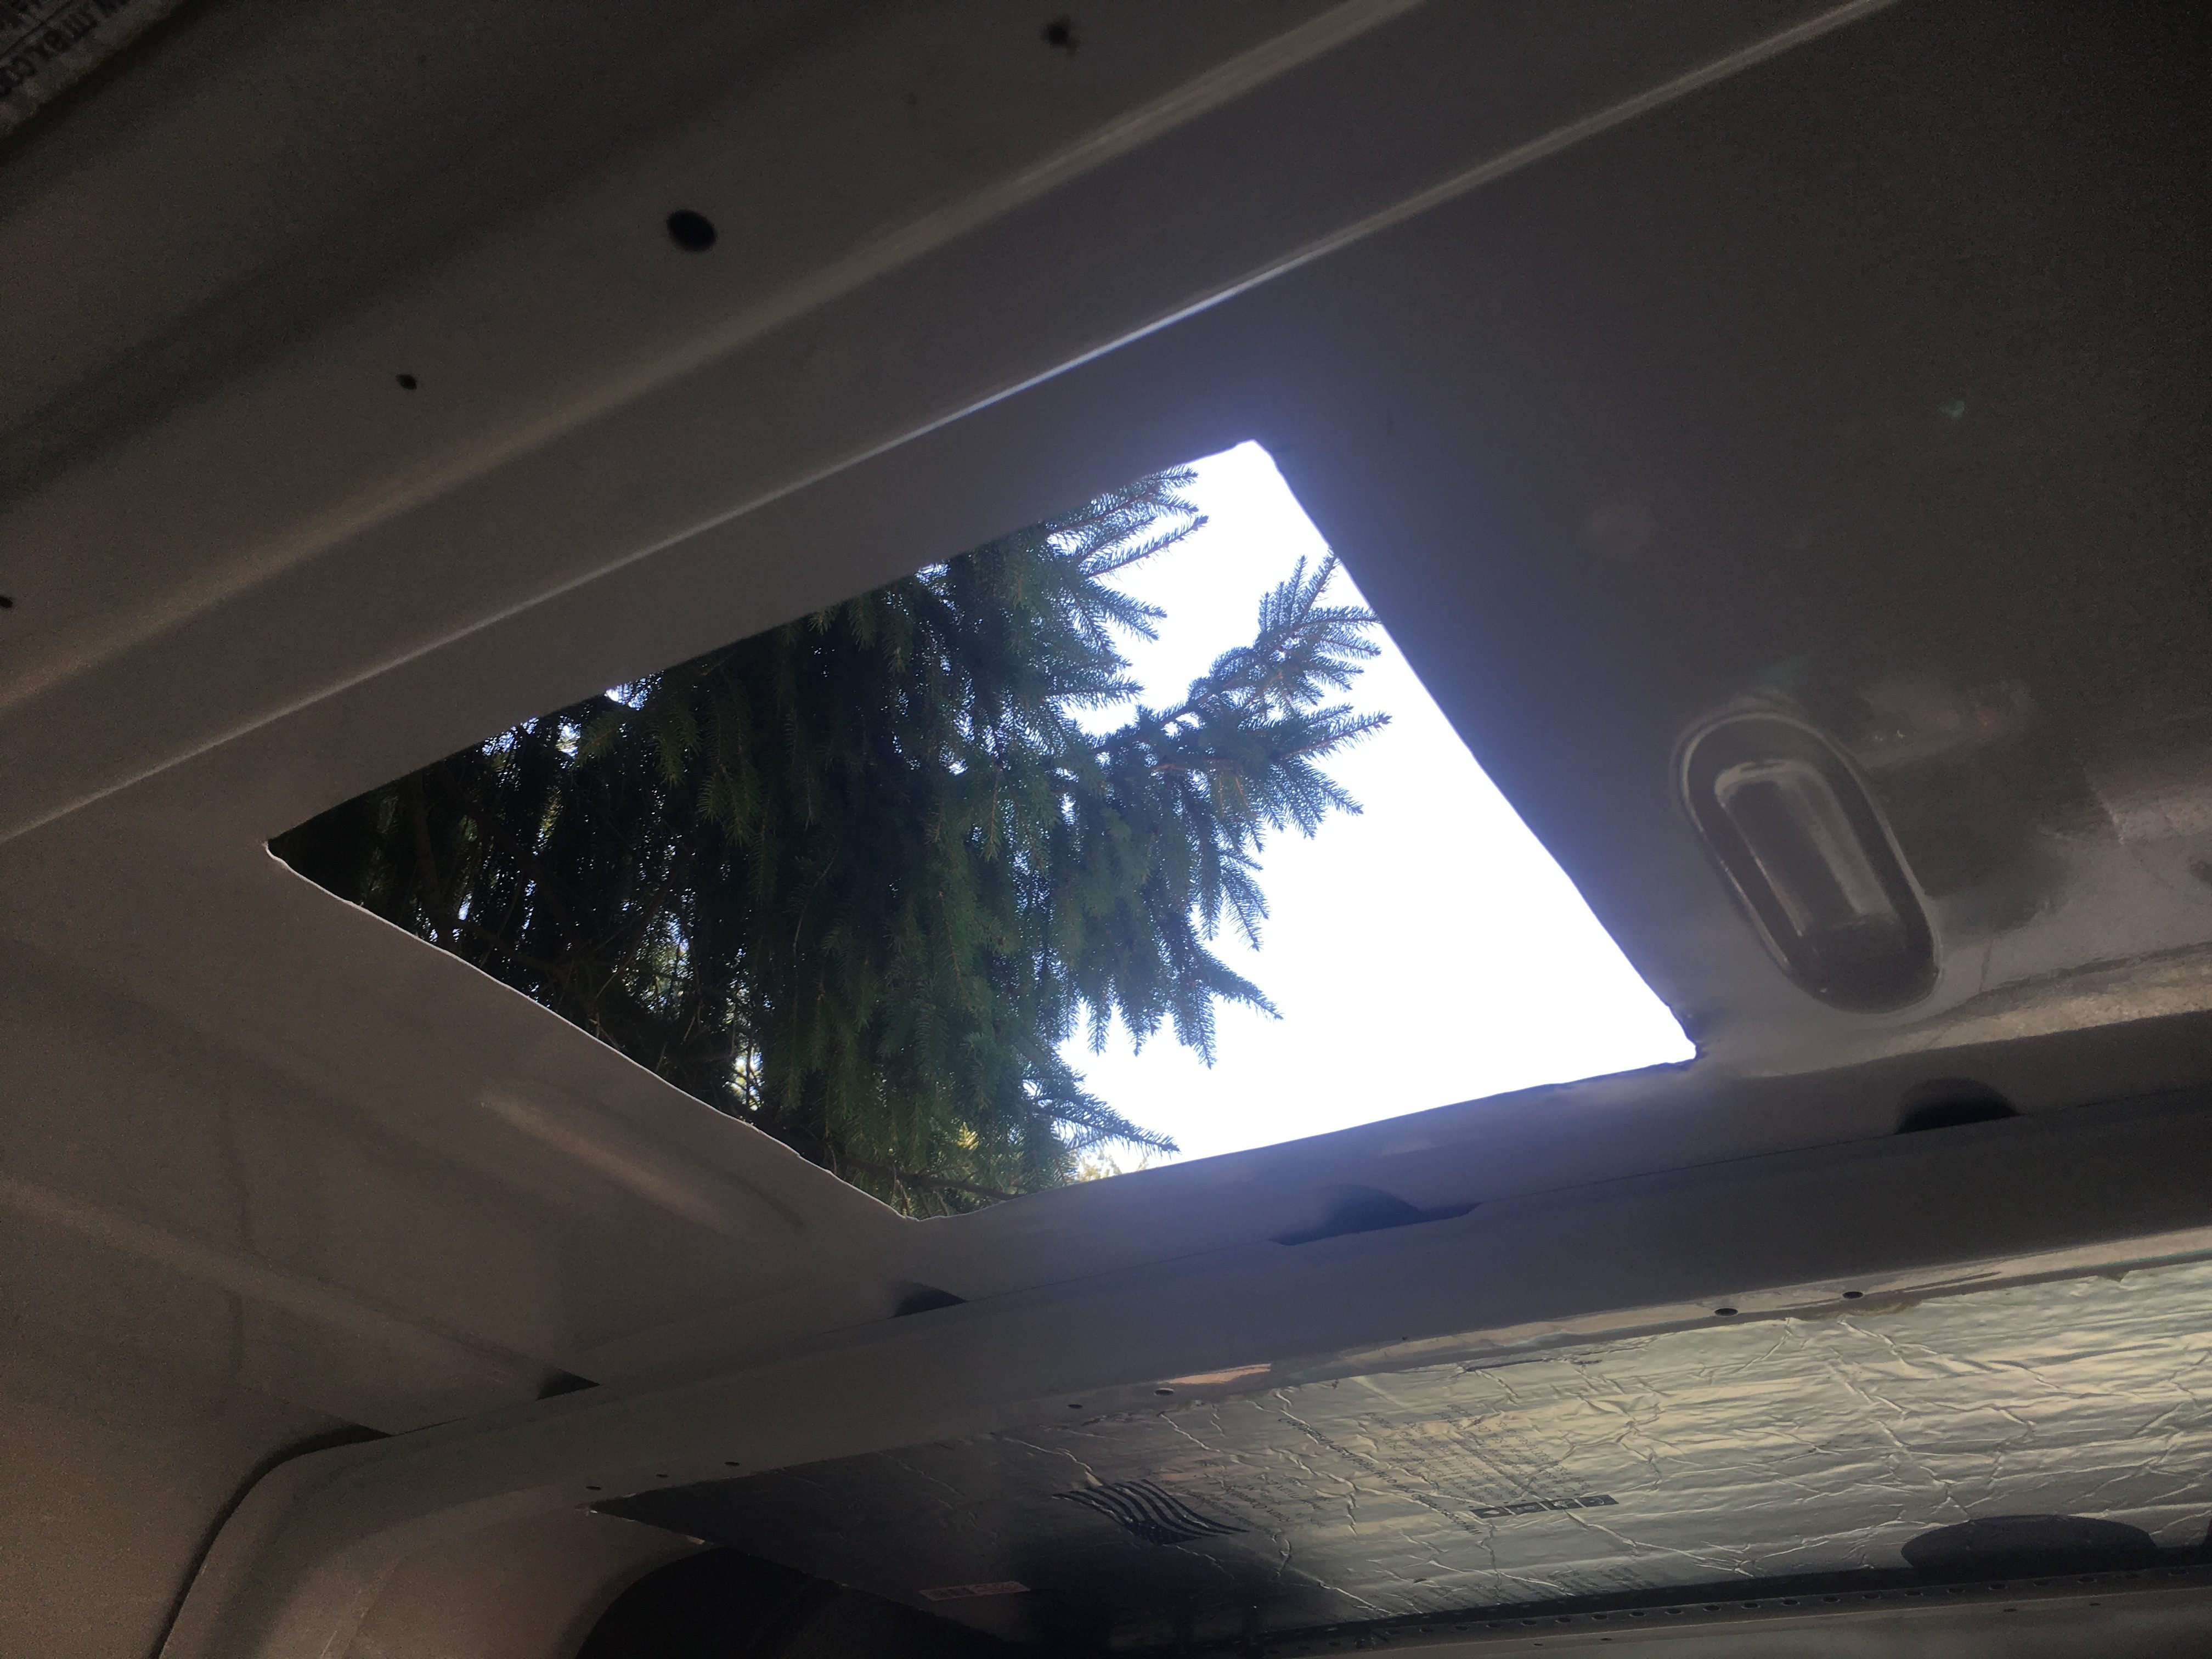
The white lid version of the fan is likely transparent as well, but the aesthetic of the smoke colored lid is much more appealing to us. The 6200k was slightly less expensive than the Maxxair 7500k, which adds a remote control and ten speeds, but in our opinion, not worth the extra cost. The manual opening and simple controls of the 4-speed 6200k have been perfect for our needs and it has an adjustable thermostat to automatically turn the fan on at a certain temperature. These fans also have a built in rain guard if the vent happens to be left open in the rain and we can say this does work well.
Insulation & Soundproofing
We had planned to travel in the van in a bare bones fashion to try things out and see how we might decide to outfit it, but it quickly became apparent that we would not be able to comfortably travel in what amounted to a giant tin can on wheels, as the road noise was simply horrendous and unbearable for anything longer than 10 minutes, at least for us.
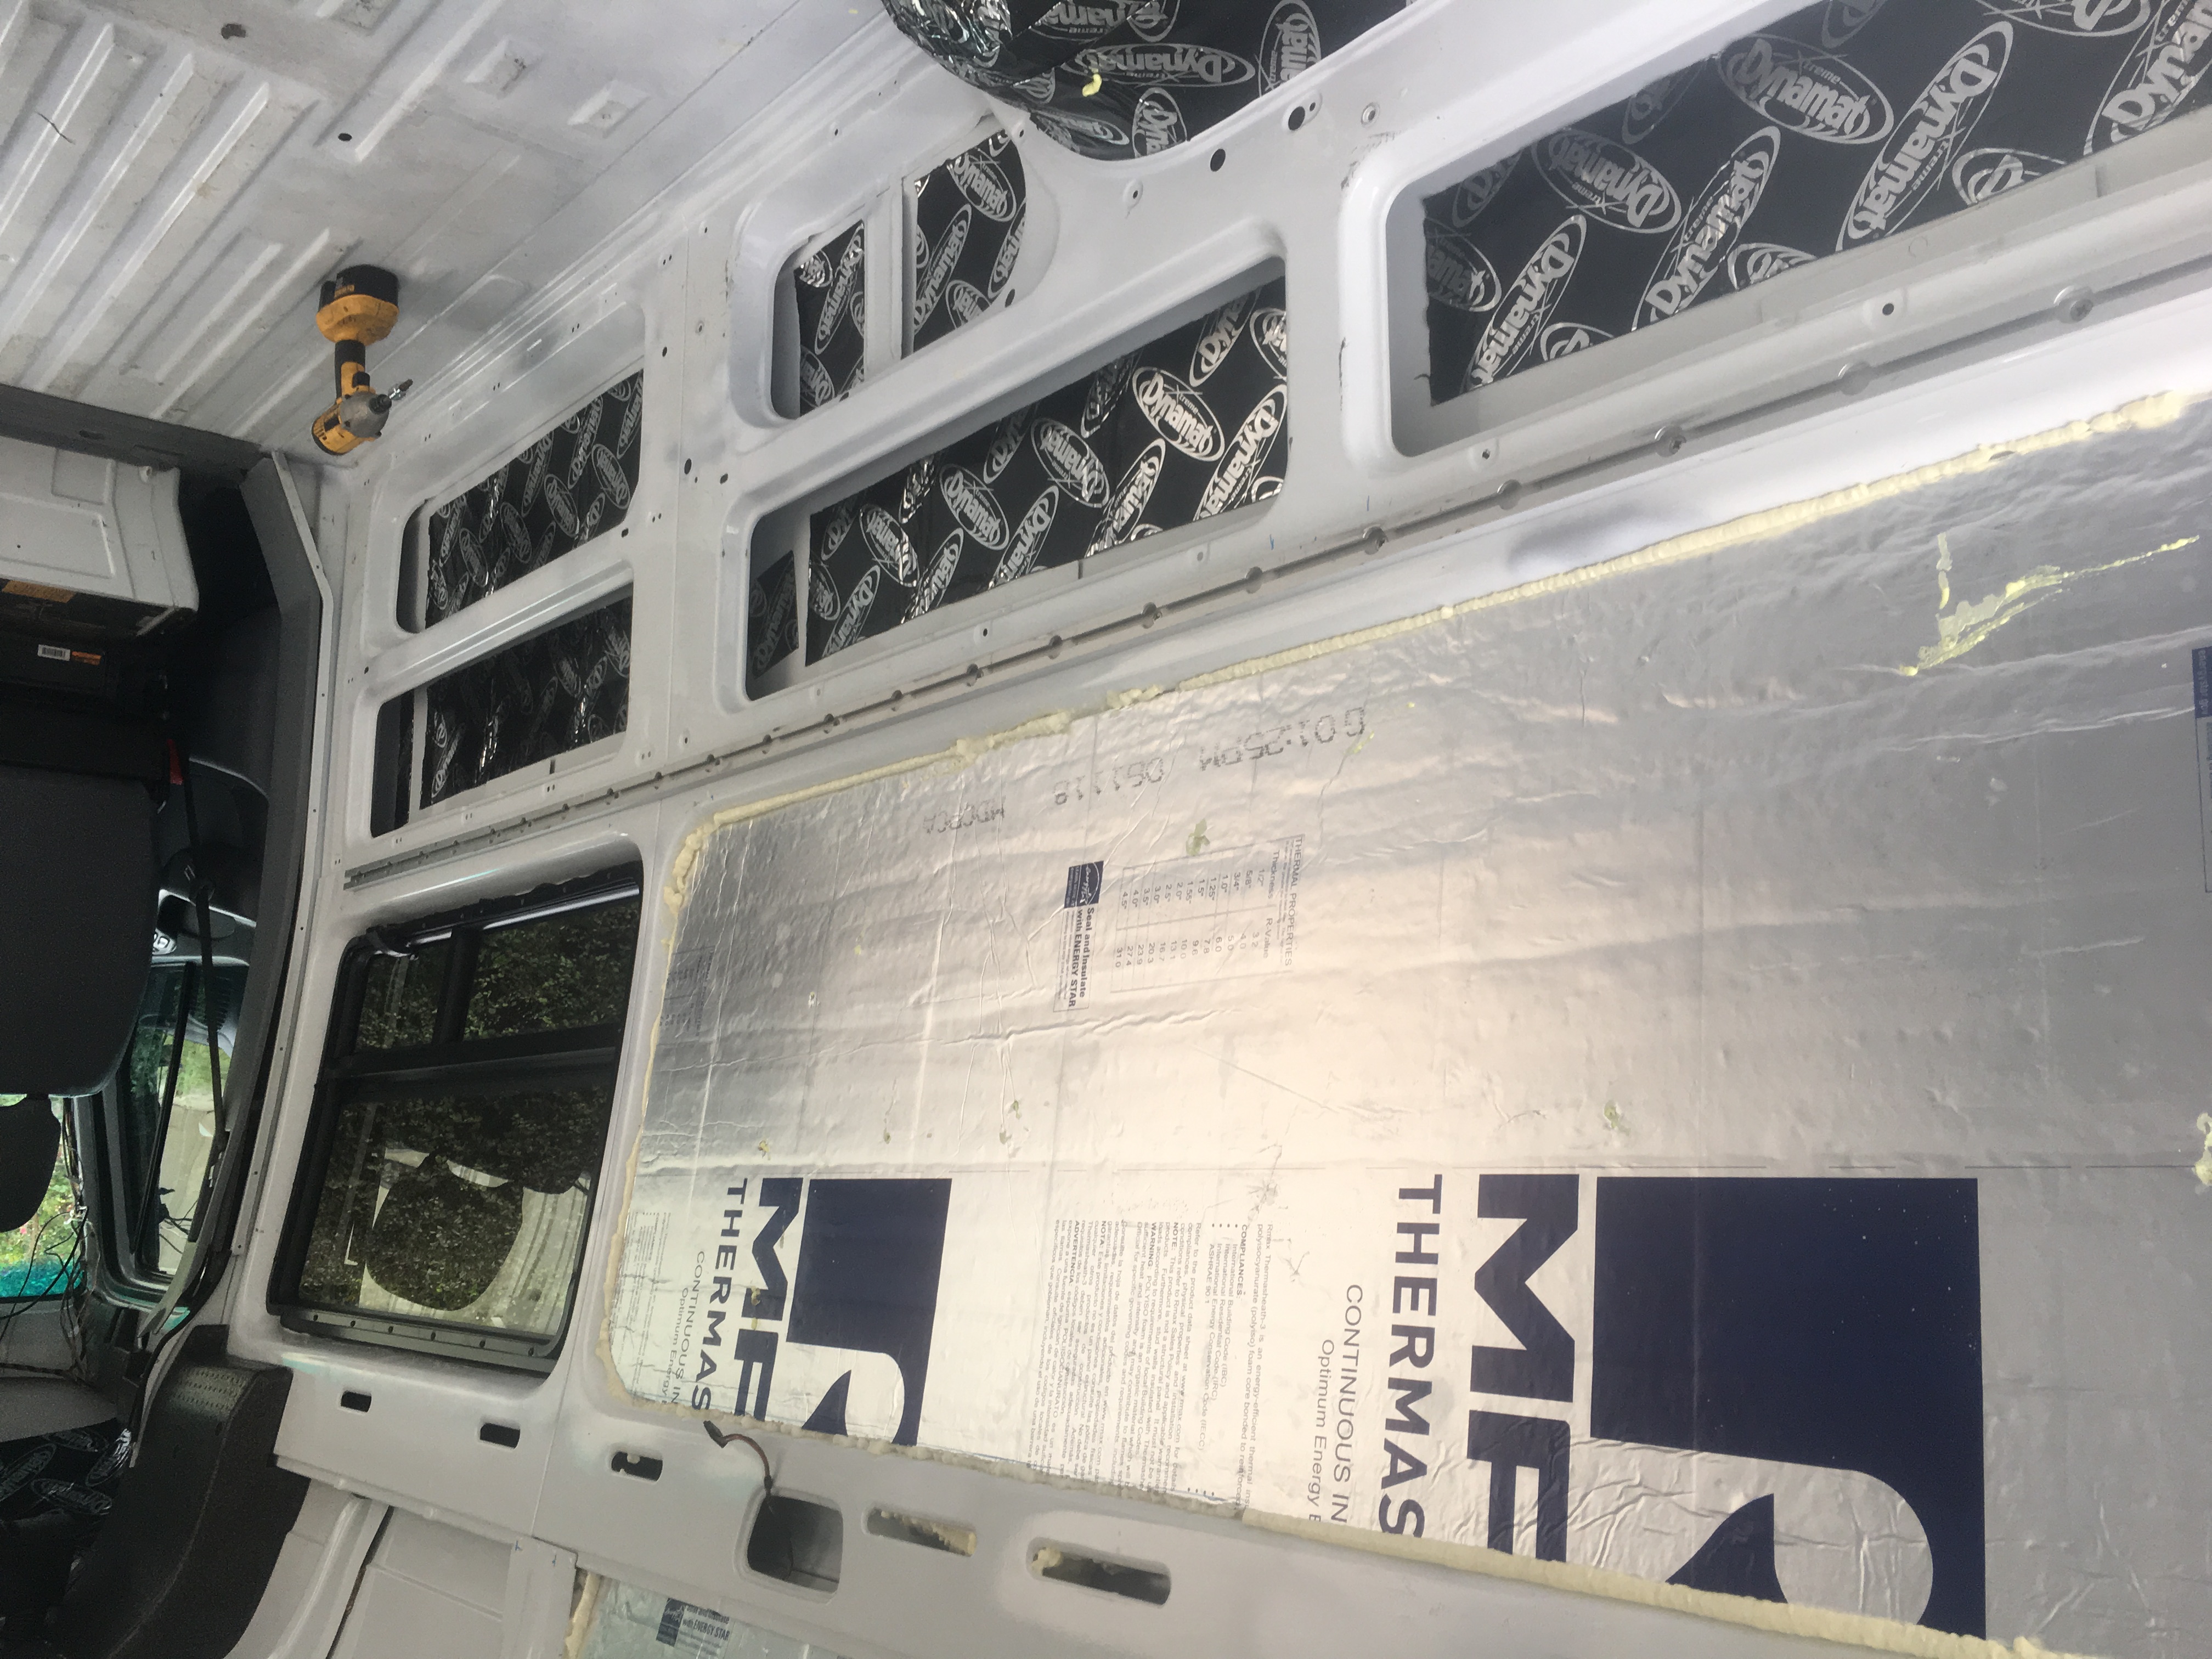
To resolve this we just jumped in and insulated the van using reclaimed 1” and 1.5” Polyiso foam board and Great Stuff closed cell spray foam to the walls and ceiling. We then added Dynamat butyl sound proofing material, lots of it! We also tried the Noico brand sound deadening material which worked well at a slightly lower price point, applying tons of these materials to every place we could find an open panel of steel that would carry and resonate road and wind noise. This combination effectively quieted the interior road noise of the van quite a bit but there were still some irking squeaks here and there on bumpy roads. We drove around tracing down and eliminating as many of these squeaks as possible before adding wooden plank walls.
For the walls, we contemplated lots of different materials but l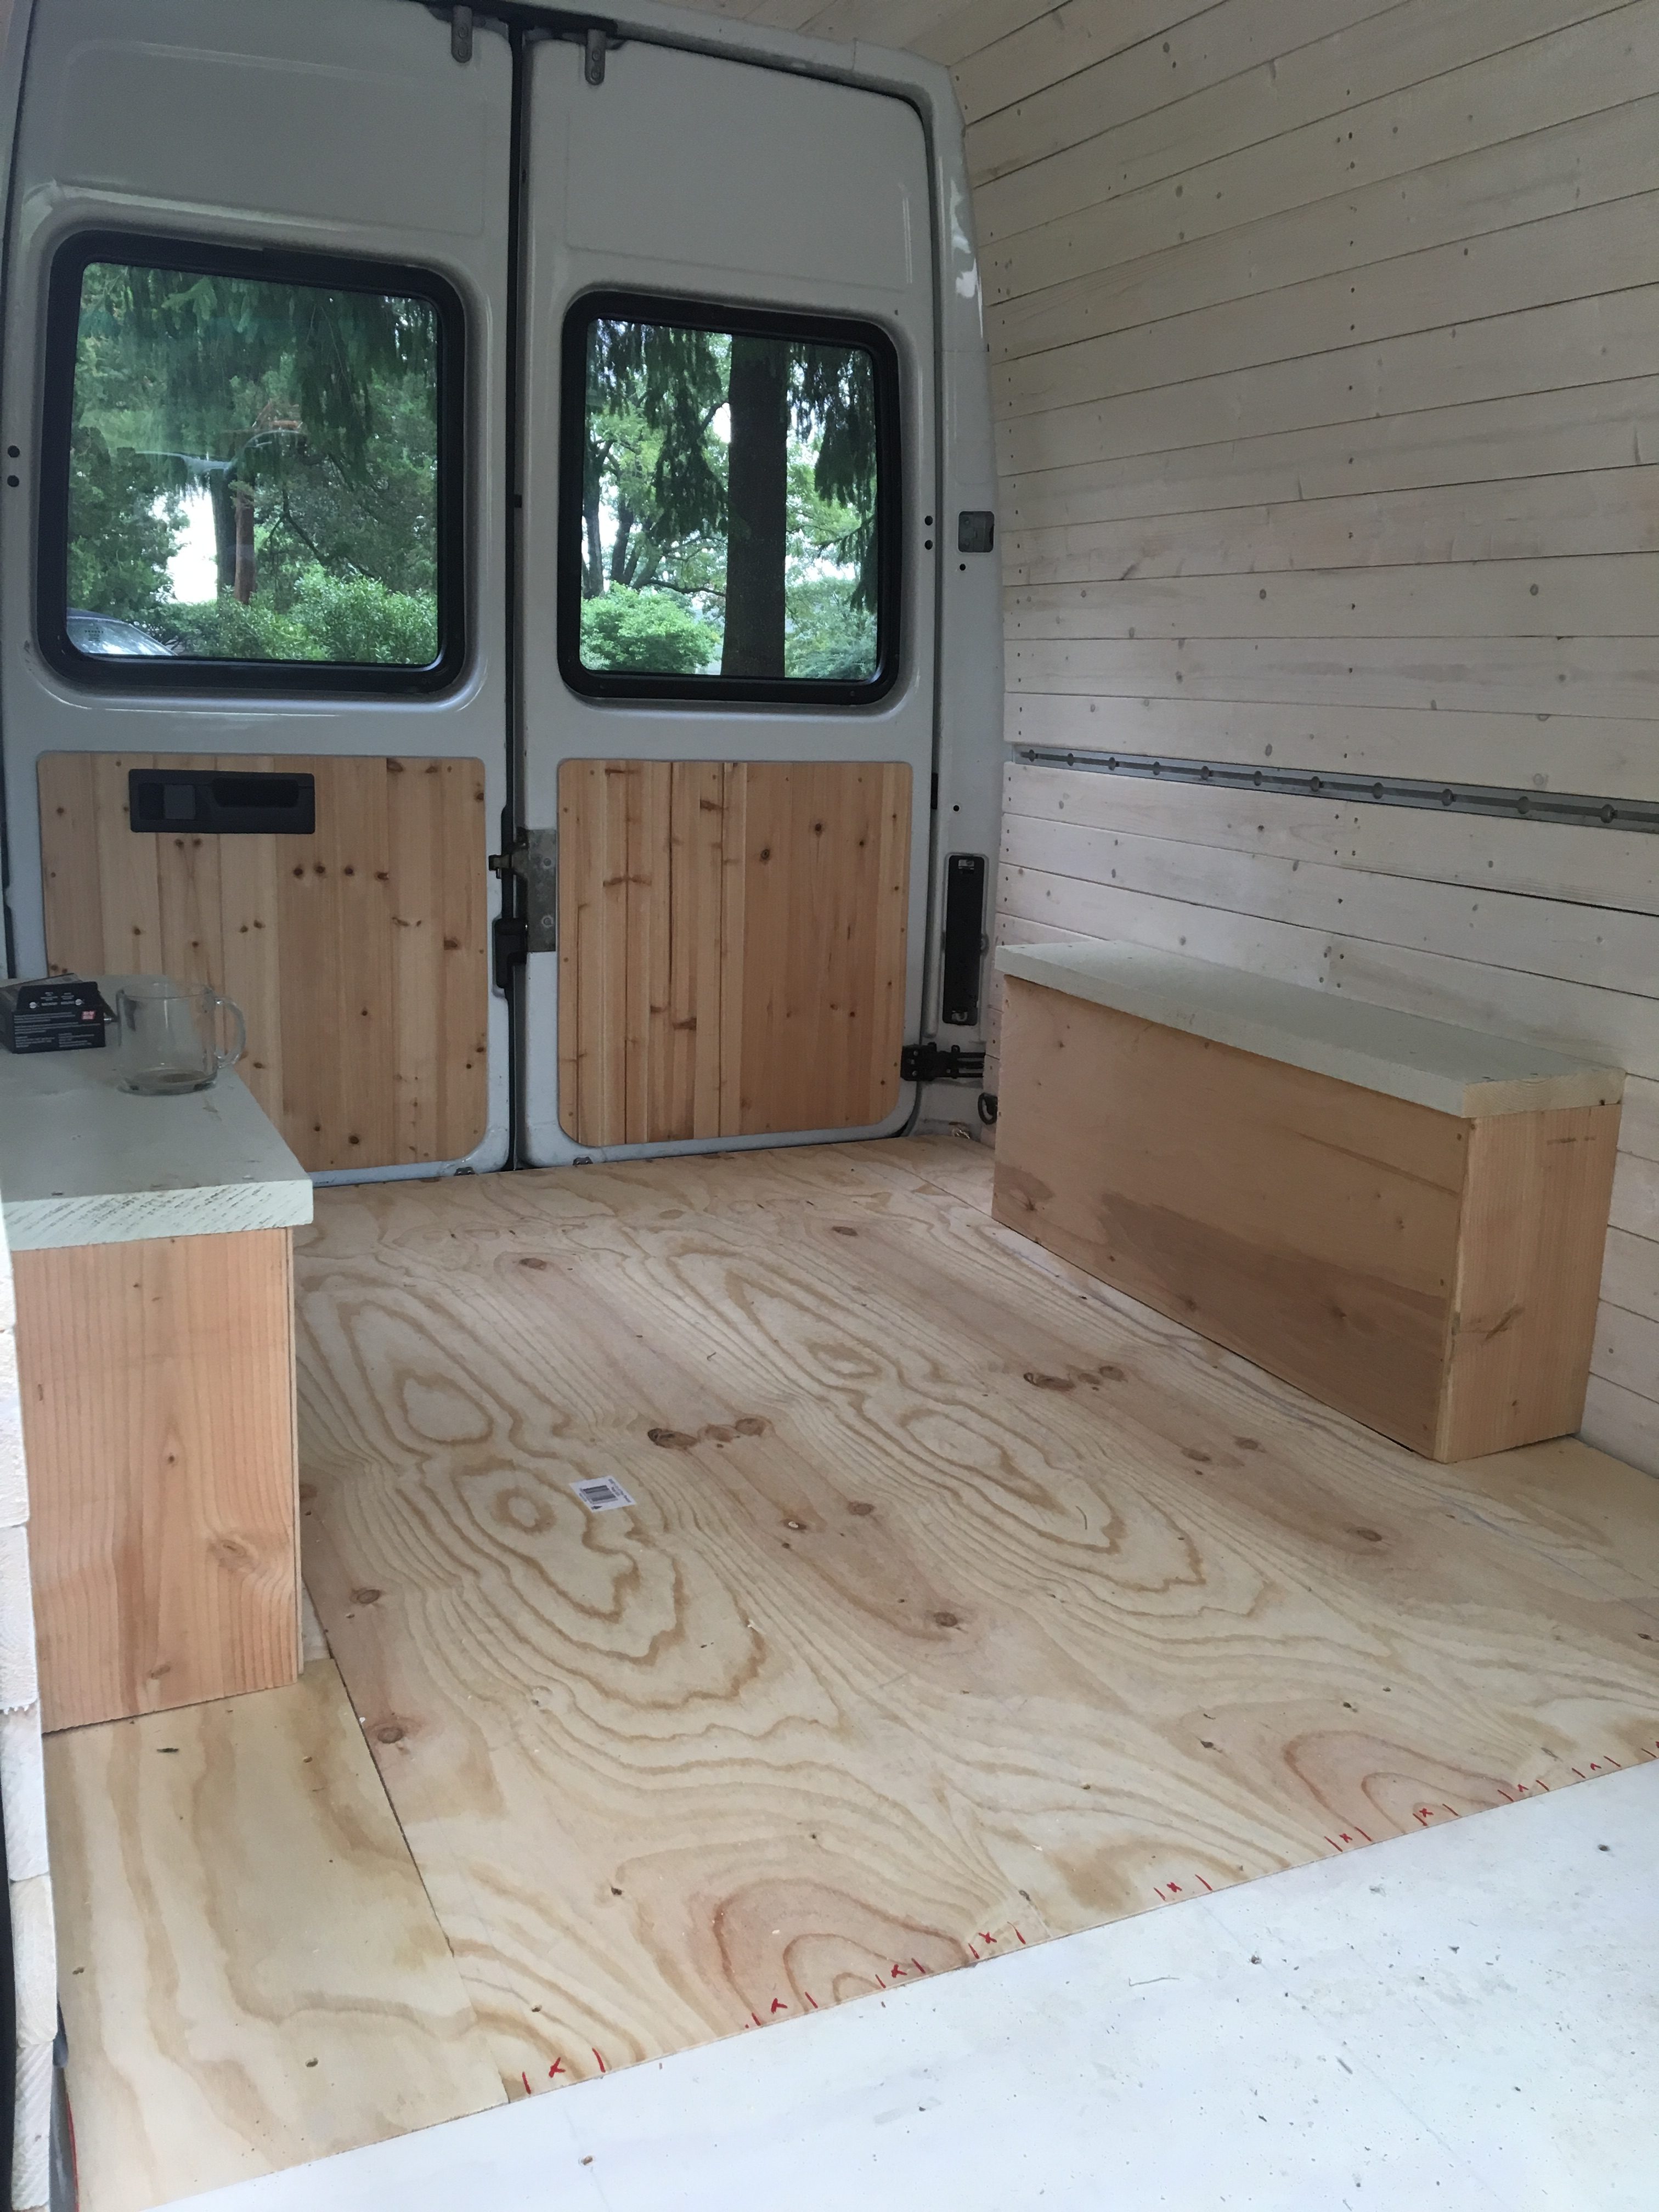 ike the warm ambience wood provides and thought about using a tongue and groove or shiplap style board. After thinking about this a little more, we decided on a simple 1×4” lath hemlock/fir planking instead. This would allow for airflow and so that a single board could be removed for fishing wires, inspecting insulation, cleaning and anything else without damaging any neighboring boards. We left all of the screws exposed for ease in plank removal and inspection as well. This approach proved to be very handy as we’ve periodically added features to the van without any hassle or damage to neighboring boards. The board planks are attached with exterior grade, heavy duty ceramic coated decking screws that will hopefully prevent rust down the road. These screws were several times the cost of typical screws but well worth the premium in our opinion.
Electric & Solar Setup
We had plans to leave for Nova Scotia that week, but wanted to be sure we’d have enough electrical power on hand to run the Maxxair fan and our 12 volt Waeco Refrigerator (now the company is called Dometic and if you want one call try the Recyclist Unlimited for a great deal) without killing the starting battery. Many van dwellers go with the awesome Goal Zero portable power units which are elegant and beautifully designed systems. However, these units are extremely expensive at over $1,200 for a good size unit, and even with an outdoor industry pro discount seemed too expensive for our immediate needs. Instead, we purchased a 120 amp hour, deep cycle marine battery (at Walmart so that we can exchange easily at any Walmart worldwide within warranty period if there’s ever an issue on the road), a 150 Amp Battery Doctor brand battery isolator, a sturdy waterproof toolbox to handle all of the wires, some heavy duty 4 -gauge copper wire, some crimpable copper lugs and a 12 volt fuse box and built our own portable power unit.
Our goal was to be able to operate electrical accessories via the deep cycle battery separately from the main starting battery, so we’d never run down the starting battery and be stranded. We wanted the deep cycle battery to charge from the van’s alternator whenever the van was running but disconnect when the alternator is not charging. We added two voltmeters, one for each battery, to independently monitor the main battery as well as the auxiliary battery. With the Battery Doctor connected to the van’s electrical system and the auxiliary battery, the power output signal from the alternator (13.5 volts+) trips a switch in the Battery Doctor circuit, that then connects the auxiliary battery to the main battery and alternator after 60 seconds so that both batteries can charge.
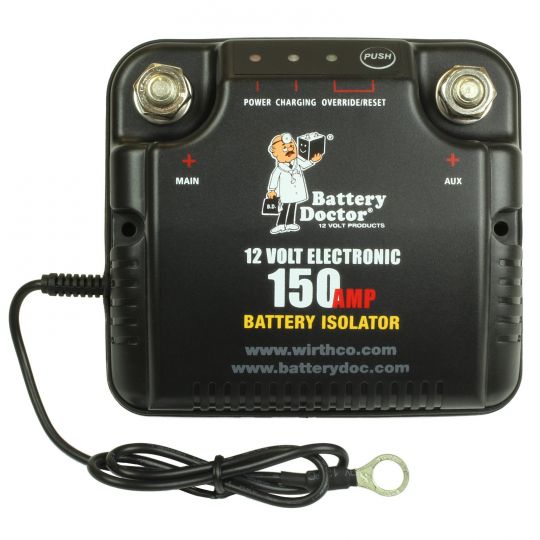
As soon as the van’s engine is shut off, the Battery Doctor senses 12.6 volts or less, as the alternator is no longer running, then cuts the connection to the auxiliary battery, leaving it completed isolated from the main starting battery. In effect, this keeps the batteries completely separated from each other when the engine is off, but connects them when the van’s engine is running and alternator charging. In the event that the starting battery gets run down and can’t start the van (if you leave headlights on for instance), there is an override button on the isolator that allows you to jump start the engine from the auxiliary battery, assuming it has the necessary voltage itself. We have a similar setup that we built ourselves on our Land Cruiser that we’ve used many times over the years. Learn more about 12 Volt electrical systems in my Auxiliary Battery Guide.
The Battery Doctor is a beautiful product that we highly recommend for any camping vehicle with a second battery. Its inexpensive, their support is world class and its a breeze to install. The auxiliary battery can be replaced with a larger deep-cycle battery at any time, or additional batteries could be added in parallel to increase your off-grid power capabilities and length of time you can run appliances without recharging. This system worked flawlessly on our maiden trip and we were able to run our refrigerator, ventilation fan, charge our phones and use LED lights 24/7 without worry of not being able to start the van. Had we not been on the move each day, our power consumption may not have been made up for by the engine running and recharging the auxiliary battery, but we had no issues on our maiden road trip as we were constantly on the move.  To address this concern though for the future, and to allow the van to sit off-grid for extended periods of time without worrying about having to run the engine to charge the auxiliary battery, we decided to add an off-grid solar system as well as a 120 volt recessed male firewall plug for “plugging in” to the grid if desired. For the solar setup, we purchased a Renogy 100 Watt Monocrystalline Solar Panel (monocrystalline panels cost more but are more efficient than polycrystalline) and an expandable Renogy Adventure Solar Charge Controller with built in digital monitoring system. The Ronogy solar system is proven and the company has a great reputation. Using the Adventure Solar Charge Controller, we can add up to 3-4 additional solar panels of the same size and output if we ever wanted more solar charging capabilities. This upgrade would be inexpensive and bring the Solar output to 400-500 watts.
 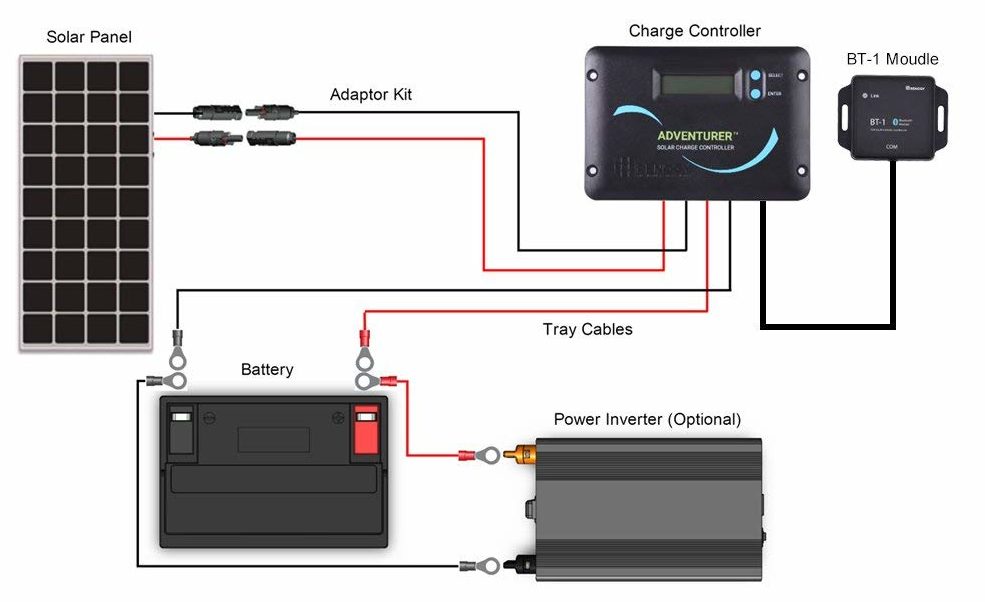 We had watched countless YouTube videos on how others were adding solar panels to their van roofs which included every anchoring method imaginable from glue and magnets, to screwing down wooden planks, attaching to expensive Aluminess brand roof racks, and even folks who just set the panel on the roof when they park. Most of them looked terrible and insecure. Having built several camping rigs over the years, we knew that we wanted a simple and clean installation and we knew we could do this cost effectively with a little research and tinkering. We decided to install aluminum t-bolt tracks the full length of the van’s roof. These tracks accept t-nuts, or t-bolts for versatility in attaching a variety of accessories to the tracks, including Thule, Yakima, Rhino or other sports rack crossbars for hauling bikes, skis, snowboards, kayaks, canoes, surfboards, roof cargo boxes and more. The tracks also allow for an attachment point for a future roof-top deck (the view is great 8 feet off the ground) and a roof awning or lights. Yakima, Thule and Rhino roof rack companies, each have their own roof track systems you can purchase but we ended up with Proline brand tracks as they are virtually the same thing at a reduced cost. Attaching the Renogy solar panel to the roof tracks was very straightforward using the aluminum mounting brackets included with the solar panels. The only trick is that you mount the panel loosely to the tracks prior to mounting the tracks to achieve the proper track spacing and allow a channel for water and snow to run off the roof. We had to drill holes in the short ends of the solar panel frames to accommodate our desired track spacing, but this was a five-minute job that ended up in a very clean looking and sturdy installation.
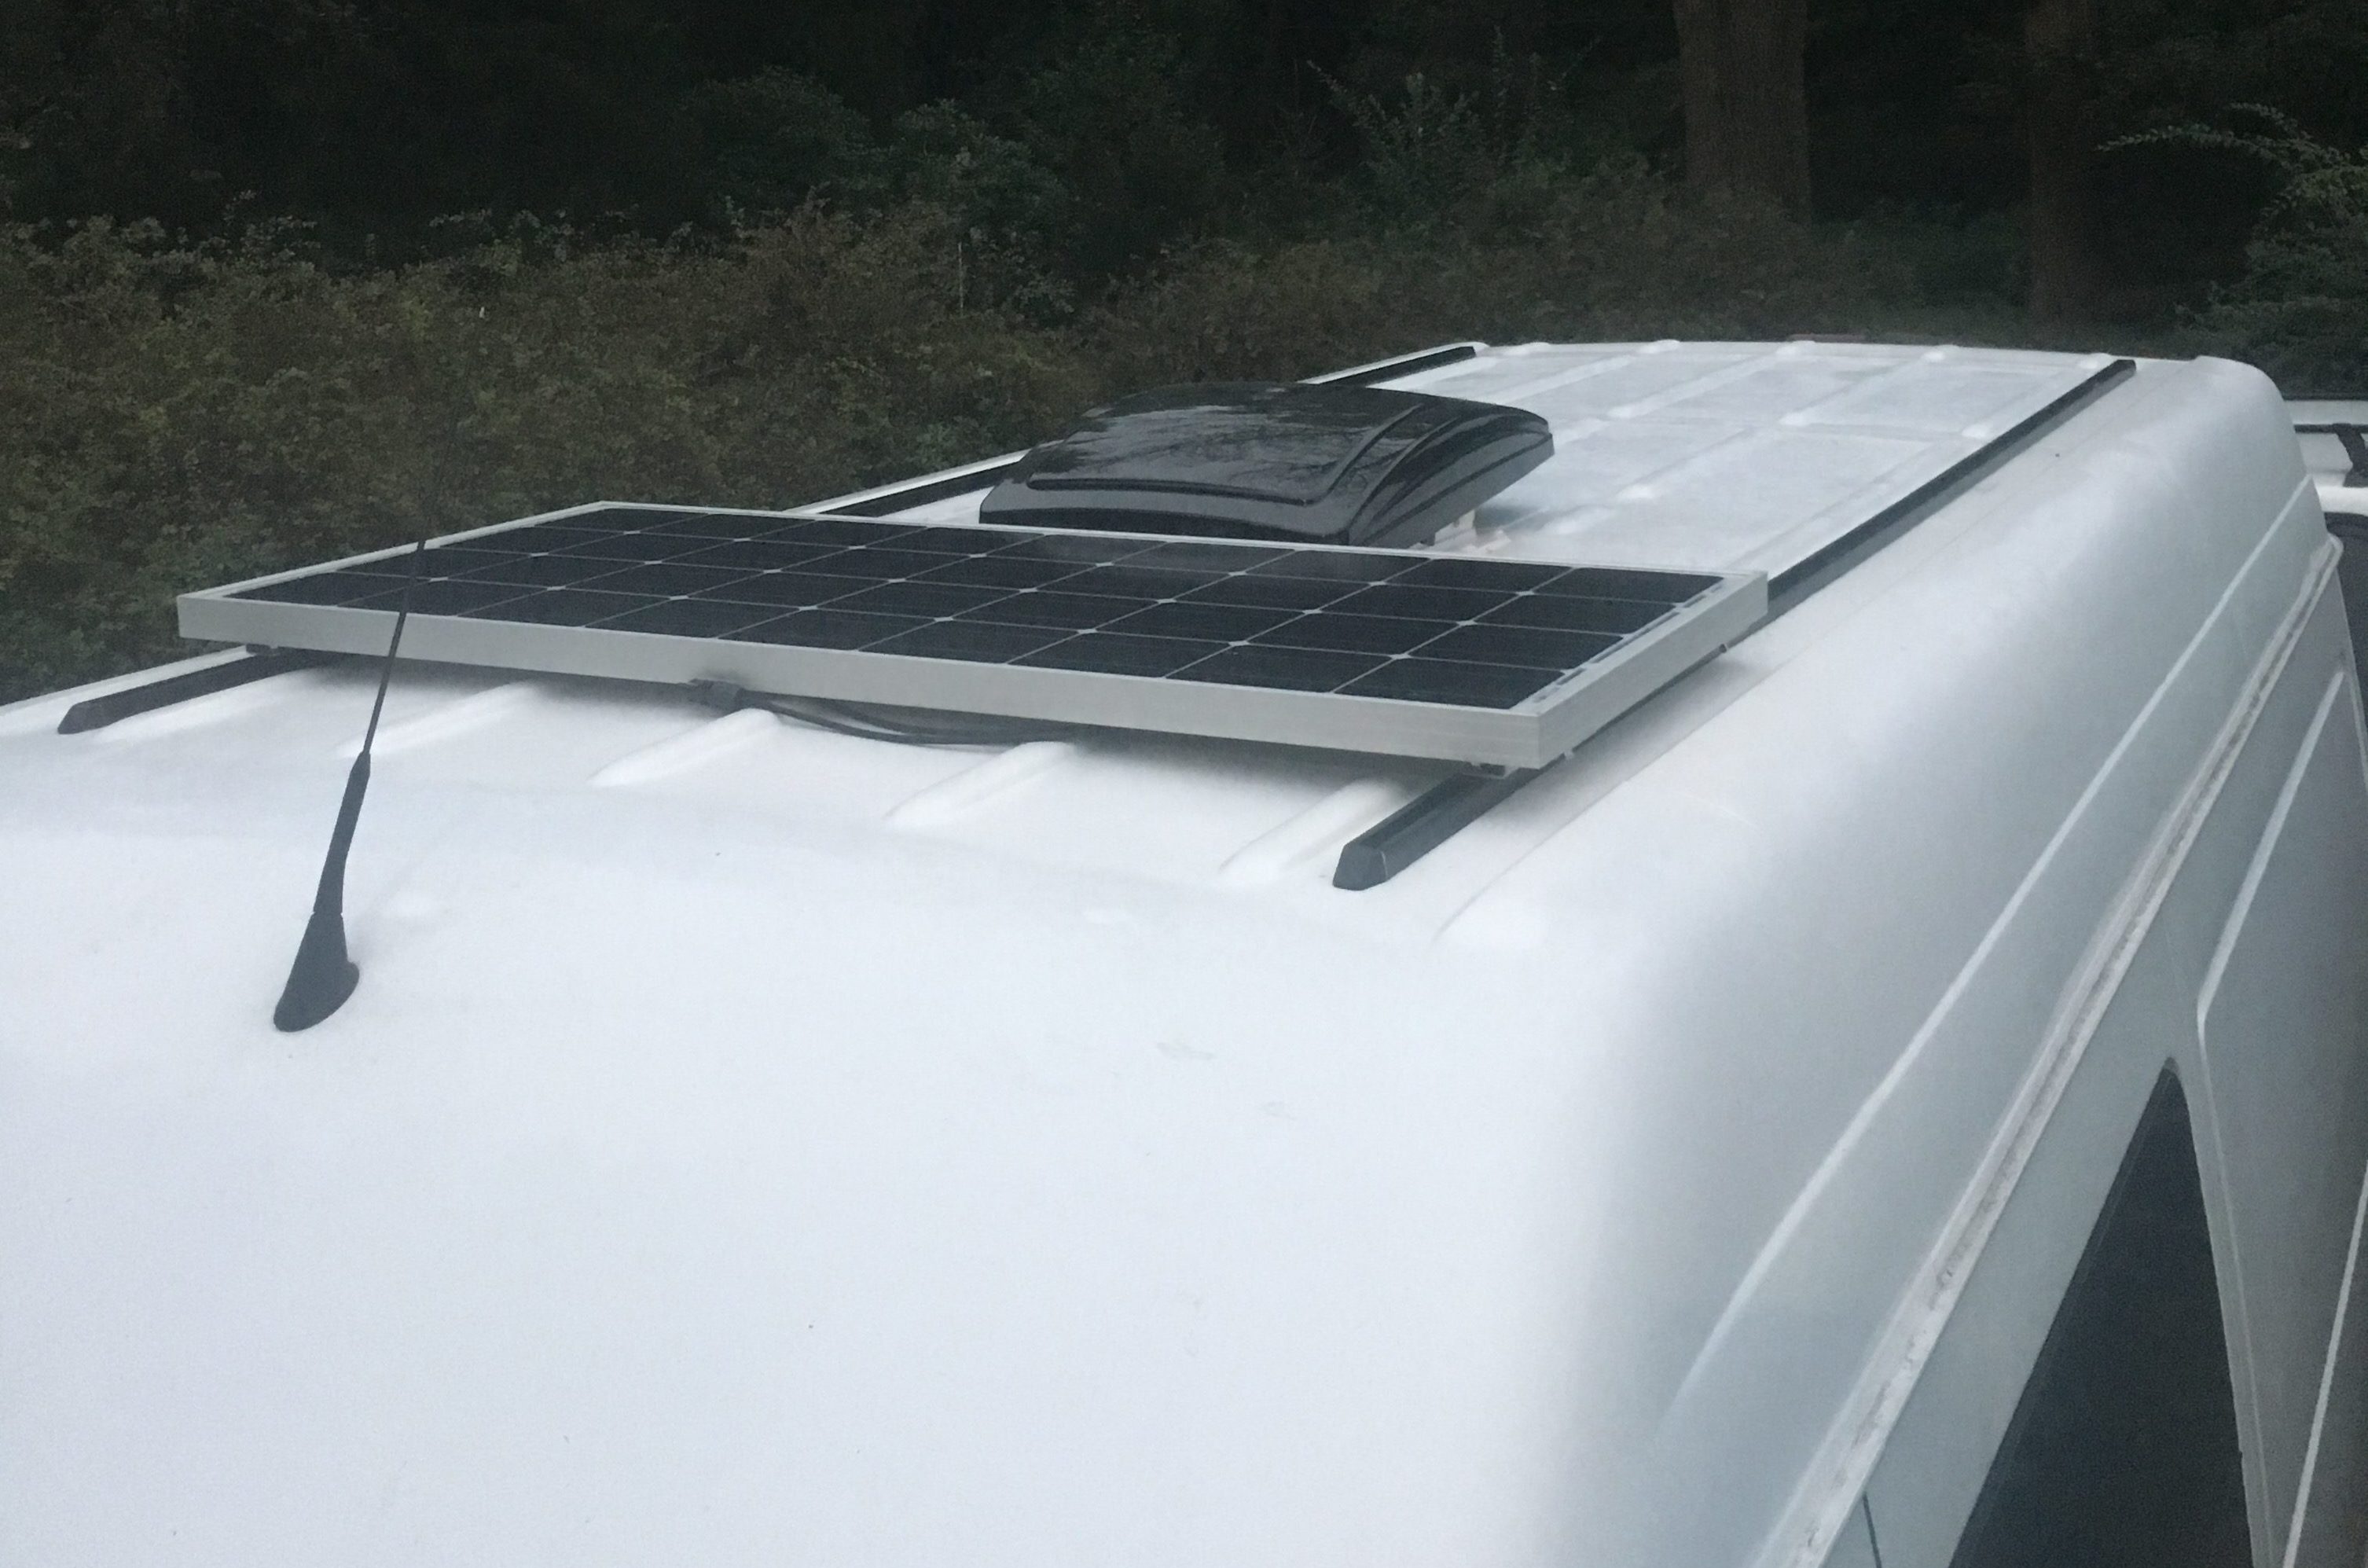
Once we had determined the proper track spacing, we attached the tracks with the included mounting hardware and touched up the roof’s paint to prevent any rust. We mounted our single 100 watt solar panel in front of the Maxxair fan, leaving room in front for a crossbar, fairing or lightbar, and still have an area over 6 feet long by 5 feet wide clear behind the fan for additonal crossbars for hauling sports equipment, installing a future roof top deck, or adding up to 4 additional 100 watt solar panels. To run the wires from the solar panel on the roof to the solar controller, we had to drill a hole in the roof and glue down the aerodynamic wire pass through box that came with our 100 Watt Renogy Solar System. After checking clearance, we decided to place this box beneath the solar panel itself to keep the rest of the roof area clear for mounting other accessories and the wires protected and out of the way. The end result is a clean, low-profile and expandable roof-top solar system that allows for complete flexibility for future expansion. I’d estimate that additional solar panels could be fitted and installed in less than 1 hour regardless of how many additional panels are added.
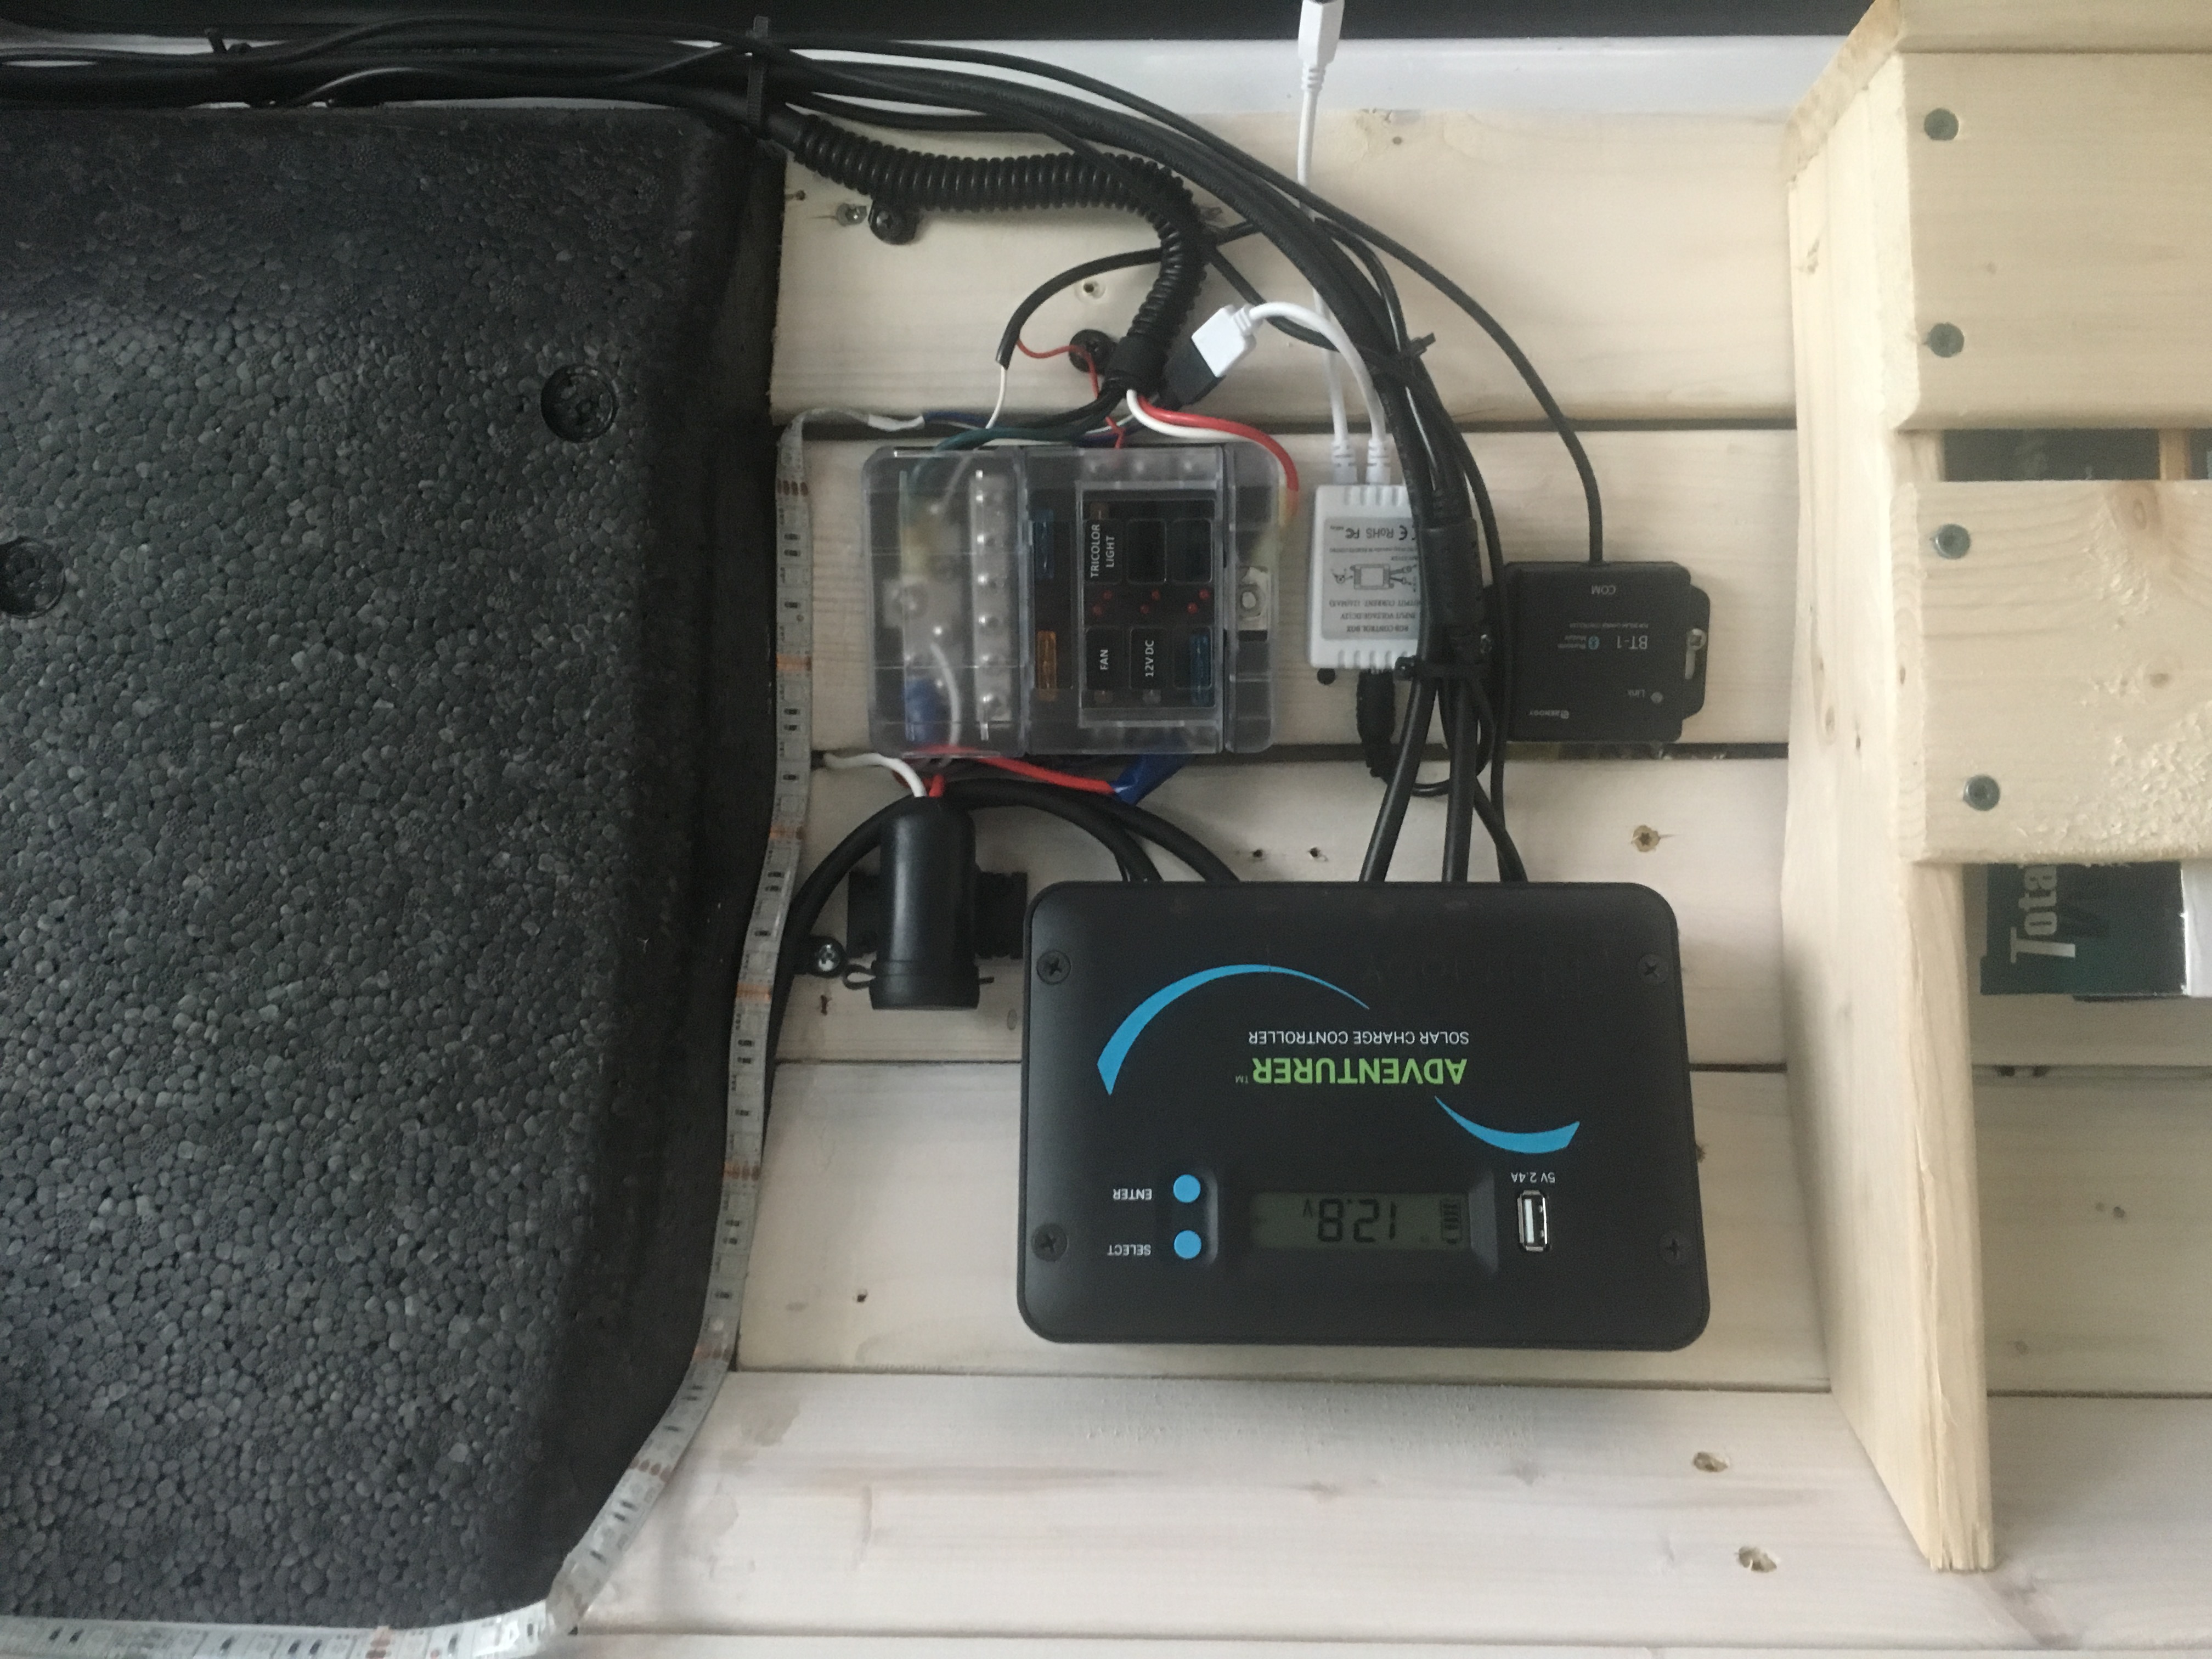
Inside the van we connected the Renogy Adventure Solar Charge Controller to our auxiliary battery using quick release MC4 connectors. Now we can leave the van unattended for extended periods of time without worrying about running the engine to charge the auxiliary battery. Our refrigerator is always on and the small amount of power it consumes from the battery is topped off whenever the sun is out. We can run our LED lights and the ventilation fan as well without draining the auxiliary battery too much. If the solar panel can’t keep up with demand, we can either run the engine to top it off or attach an extension cord to the NOCO 120 flush mounted 120 volt recessed male plug we installed directly behind the fuel tank filler. The 120 volt plug in, merely provides a water tight pass through for getting grid power into the van when you plug in instead of hanging an extension cord through a window. This allows you to plug in to either a standard GFCI protected 15 or 20 amp wall outlet on a building or at a campsite, or alternatively plugging into a small portable generator. Inside the van, you have a typical 120 volt outlet and power strip that you can use to charge the auxiliary battery, or directly plug in any 120 volt appliances like a coffee maker, laptop, TV or microwave. The overall electrical system is straightforward and well thought out for maximum versatility while remaining easy to expand as needs arise. All of the appropriate sized wires are used, all circuits are fused or double fused, and quick connections were used for ease of maintenance, cleaning and future expansion. We used Anderson style quick connects to connect the auxiliary battery box to the main van electrical system and MC4 style connectors for connecting the solar panel to the solar charge controller as well as the solar charge controller to the auxiliary battery.

The battery box can be removed with several quick connects, to use the aux battery as a portable power supply during a home power outage or an emergency jump box if ever desired. We’re using a 1500 watt continuous power inverter with a 3000 watt surge capacity, more than enough to power any appliance we’d need, including a portable heater, coffee maker or even a microwave. Of course these high demand appliances will require the engine to be running during use or shortly after so as not to overdraw the auxiliary battery to the point of damaging it. If longer off-grid high demand appliance use were ever desired, additional batteries and solar panels could be easily incorporated as plug and play additions with no additional holes or wiring needed.
Plumbing
For plumbing in the van, we decided to follow a similar approach aiming for maximum versatility but keeping things simple and straightforward. We used a 20” stainless steel kitchen sink fit into a black mahogany countertop that we made from leftover porch flooring material we had on hand. We added a drain line that runs out beneath the van and connects to the sink inside via quick connect fitting in the interior wall beneath the sink. The sink drain can also be quick connected to a 5 or 6 gallon interior gray water tank when camping in sensitive areas or for longer than a night or two so gray water doesn’t have to drain to the ground outside. We’re always careful to use biodegradable soaps in the sink installed soap dispenser so there is no environmental harm. Our favorite is Dr. Bronners Castile Soap, you can even brush your teeth with the stuff. With the countertop and sink taking up the space directly behind the driver’s seat, we opted for a 360 degree swivel for the passenger seat only. We used Sportcraft brand plate which was easy to install and operate with only 4 bolts. After several hundred miles we heard the release lever making some noise but this was quickly solved with a few zip ties to reduce the subtle clanking sound of the lever (did I say that we can’t stand stray noises).

Water is supplied to the sink from a 5 gallon Scepter Water can that fits beneath the sink. Scepter water cans are very durable and used by the military in harsh environments all over the world. We like this system as the cans are portable and easy for one person to manage and fill up just about anywhere. You can carry as many extra cans as you like in the back of the van and swap them out as needed. Instead of an electric water pump, we went for a hand operated “Rocket Pump” style faucet as commonly used on sail boats. This faucet has a vinyl tube that simply fits into the Scepter water can, and pumps out a nice stream of water when the lever is operated. In addition to the hand pump, we installed a regular sink faucet for use when docking somewhere with a hose connection. We installed a female threaded water inlet connection with cap, next to the electrical plugin for connecting a common garden hose. When connected to a water source, the water from the hose can be left on and then the standard sink faucet can provide water to the sink, then drain out under the van. The sink is large enough that you can even wash your hair or feet in it if desired.
Interior
Where do we poo? We opted not to install a full bathroom as the space in a Sprinter 140 is not conducive to it. Instead we use the sink for all washing purposes and carry a Luggable Loo seat attached to a5 gallon bucket for emergency poops. We choose to use this setup really only for emergencies, and we try to use a restroom or the great outdoors whenever possible, but the loo is definitely nice to have while stealth camping in the middle of the night. Since we don’t use it much, the rule is two biodegradable bags, draped over the seat so you are actually sitting on the bags when using the loo. This makes cleanup a snap and keeps the loo itself clean enough to eat off of, we literally never have to clean it. The bed system we devised is versatile as well. Since we were not living in the van full time, we have plenty of storage at home and tend to only take the gear we may need for a specific trip, be it bikes, paddle boards, skis, snowboards, whatever. There’s actually enough room for all of these items at once too, it’s just that we prefer having an uncluttered open space and room to move than having a cramped living experience. So, the bed system we ended up with is a 4” thick, folding foam futon mattress from Ikea that we cut to size. We used a tri-fold aluminum ATV loading ramp as a bed frame. The frame is lightweight yet strong and attached above the driver’s side rear wheel well behind the sink. Although it weighs only 20 pounds, the frame is rated to hold up to 1750 pounds (far more people than you’d want in this bed). The bed has three modes; couch mode, which we use 90% of the time and leave set up for lounging when driving or parking during the daytime; bed mode, which opens in 10 seconds and has loads of storage underneath with a big & comfortable sleeping platform; and completely stowed mode which allows the mattress and frame to be folded flat up against the wall for full use of the floor space between the wheel wells. For those that don’t know, Sprinter vans were designed much like many American pickup trucks with room for standard sheet goods to fit laying flat between the wheel wells that are 50” wide.

Standard U.S. sheet goods are 4 feet wide by 8 feet long so they fit perfectly flat on the floor and we maintained this capability in our build. This means if you need to use the van for hauling plywood, drywall, foam insulation board, or sheets of metal, its as easy as folding the bed platform up against the wall and securing in 10 seconds. Room is also still present to use the van to haul up to 2 full pallets of whatever else you like through the back doors if needed. The bed can be tucked up out of the way without having to remove anything from the van, easily converting the van back into a cargo hauler whenever needed. We like keeping things versatile.
For the floor, we installed 3/4” exterior grade plywood on top of a foam insulation sheet over the Dynamat soundproofing that we had covered the steel flooring with. Over the plywood we installed Lifeproof brand heavy duty, waterproof plank flooring. We purchased the flooring material at Home Depot but it is nearly identical to the material shown here. The planks click together and normally “float” on the subfloor in conventional building applications, but since this was a vehicular install, we used heavy duty 3M double-sided tape for securing the planks to the plywood subfloor. The plank flooring looks nice, is very durable, has a built in sound deadening underlayment and fit together very tightly overall. We can attest to their waterproof claim and are happy with the over all feel and look. The flooring is a premium product and doesn’t have the sticky quality that many vinyl flooring products do, so it feels nice even barefoot. For this reason you must make sure any cargo is secured so it doesn’t slide around on the floor but we far prefer this to a sticky vinyl floor ourselves.
A multi-colored LED lighting strip was installed around the perimeter of the ceiling which provides a nice ambience in the van at night. It plays nicely with the white stained pine plank walls and gray plank flooring so it feels like a high-end mountain lodge, rather than a gaudy limousine. The lighting strip is powered by the auxiliary battery and uses very little power in any of the adjustable brightness settings. In addition to the LED strip lighting, we use several battery powered magnetic LED lights that we can move around the van wherever needed, even outside. They are very handy and eliminate the hidden wires that many folks install behind walls that could short out and cause headaches down the road. We covered the sliding door and rear doors in thin cedar planking similar in apperance to the pine planking used elsewhere throughout the build. The cedar should help reduce insects in the van as they dislike the smell of the cedar oils, yet we think it smells great and keeps it smelling fresh. On one of the rear doors, we added a bracket to stow a folding plastic table, very handy for camping, setting up a temporary dining spot or even a field desk. You don’t even know it’s on the door yet the table is always with you when needed.
Cab Area
In the cab area of the van, we made a few minor improvements, including soundproofing the ceiling and doors, adding a voltmeter for monitoring the main battery and alternator output, adding USB power outlets, wooden storage slots, and a large Cordura nylon pocket system for stowing road atlases and maps in the overhead bulkhead. We also purchased a set of metal framed window screens specifically built for the front doors on this style of Sprinter. They were expensive but are great for added ventilation, keep the bugs out and keep the van safe and dry. They simply slip into the frame and you close the windows on them to secure them and from the outside they are hardly noticeable at all, leaving the van’s stealth quality.
As mentioned earlier, gear storage was kept to a minimum level to maintain maximum versatility. There is loads of space but minimal built in storage. We did install two thru-axle fork mounts for stowing our mountain bikes. With both bikes in place, we still have space to use the bed in all three modes and in couch mode specifically, we have an open alleyway from the front of the van all the way to the passenger side back door. Since the bike mounts require removing the front wheels, we fabricated a simple wheel mounting system for stowing a single wheel in front of each back door window out of Pex plumbing pipe and some wire clamps. The mounts can take up to a 29” wheel (we use them for 27.5+ wheels) and most importantly keep the brake discs protected from getting bent, as they fit perfectly in the void between the door frame and the window glass. The bikes can be deployed or securely stowed in approximately 2 minutes each.
Tools & Spares

Joel Sell of Million Mile Sprinter recommends a Deko 120 piece metric toolset for all Sprinter owners. Joel is a former Volkswagen mechanic in Philadelphia who now runs a business called Million Mile Sprinter focused exclusively on the T1N series Sprinters that were built from 1994-2006, but only imported to the U.S. from 2002-2006. With his knowledge of tearing T1Ns down and rebuilding them, Joel determined that the Deko kit is nearly complete for any roadside repair you’d need to do. Joel has also assembled a handy spare parts kit of the most common parts to fail on the T1N. His “118” kitcontains a spare fuel filter, coolant temp sensor, camshaft sensor, crankshaft sensor, ECU relay, oil drain nut, and serpentine belt. In spite of the name, the kit is appropriate for any 2004-2006 Sprinter. None of these parts are difficult to install, yet any of them could leave you stranded on the road or require a tow while you track down a part on a road trip. We keep these spare parts, a spare set of standard automotive fuses, and the recommended toolkit stored in the Sprinter at all times.
We also purchased an iCarSoft MBII Code Reader setup for reading any and all diagnosis codes the Sprinter may throw. This tool is an investment but could prove quite valuable, save money and provides peace of mind in determining what exactly caused a check engine light to come on while miles from home or your mechanic. Rounding out our van build, we installed General Tire AT2, all terrain tires in one size over the factory installed tires, 245/75R16 to be exact, mounted on the factory wheels. These tires are “Load Range E” with the strong sidewalls needed in Sprinters and rated for severe snow conditions. We’ve had great life and traction out of these tires on our Land Cruiser and Silverado, so they seemed appropriate here as well, to give a bit more confidence on dirt roads getting to camping spots or inclement weather, though we’re not sure how the Sprinter is going to do in the winter yet. If only a 4×4 conversion were available at a reasonable cost.

Van Converts
Our ah-ha moment came after 10 days of touring all over the Canadian Maritimes and realizing we had only spent $20 on accomodations, the one night we stayed in an official campground, mainly to get showers. The rest of the time we stealth camped and slept comfortably in the Sprinter, waking up within feet of the ocean multiple nights, and riding out 80 MPH winds in the Canadian Maritimes with smiles on our faces. It felt like cheating and was in fact more comfortable than many hotels without merely a thought of the cleanliness of prior guests.
Yeah, we totally get the van thing now. In 4,000 miles of driving Shamu, we never saw less than 22 MPG, and in fact averaged closer to 25 MPG! The lower carbon footprint of long lasting build quality and the increased fuel economy is a definite benefit of the Sprinter over vans from other manufacturers. The only real shortcoming for us was the lack of 4-wheel drive as we are avid winter sports enthusiasts. Some of our most memorable experiences have been early mornings and late nights in very remote places in the depths of winter. Blizzards, snowstorms, and unplowed forest roads that are closed all winter and outside of cell service in purely beautiful wilderness environments. These places would have been far more dangerous, actually make that impossible to get to without a capable, high clearance 4×4 with aggressive winter tires and even tire chains on all 4 wheels. You simply can’t get to these places in the winter without 4 wheel drive regardless of what some may say. Those who doubt that just haven’t been to the places we’re speaking of and I just assume keep it that way. For this reason alone, we’ve decided to sell and pass Shamu along to someone with more normal opinions of good weather and destinations.
Update: Shamu has been sold and is currently traveling throughout North America with Benny and Morgan. They can be followed on Instagram @itsmorgandall and now call the van “Louis”. As Lao Tzu says, “names can name no lasting name.”